
| Return to woodworking tools 21 to 30 |
31. Wooden Clamps
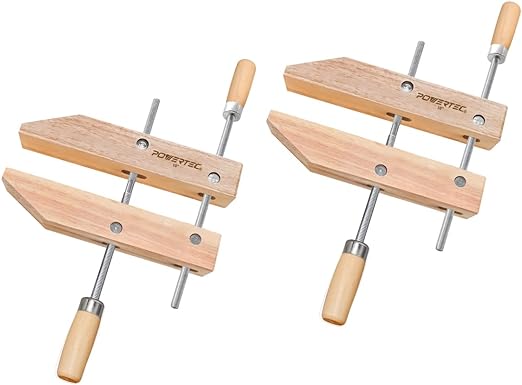 Wooden clamps, also known as wood clamps or hand screw clamps, are essential tools used in woodworking and various other applications to hold, secure, or apply pressure to workpieces. They consist of two wooden jaws connected by a long threaded screw and are designed to firmly grip materials during gluing, assembly, or carving tasks. Here’s a comprehensive look at wooden clamps:
Components of Wooden Clamps:
A typical wooden clamp consists of the following essential components
Jaws: Wooden clamps have two wooden jaws, usually made from hardwood like maple or beech, that come into direct contact with the workpiece. These jaws have flat, parallel surfaces and may be lined with cork or leather to prevent the marring of delicate materials.
Screw Mechanism: The screw mechanism is the central component of the clamp and is responsible for applying pressure. It consists of a long threaded screw and a handle. Turning the handle clockwise tightens the jaws, applying pressure to the workpiece, while turning it counterclockwise releases the pressure.
Parallel Guide Bars: Some wooden clamps have parallel guide bars or tracks along the length of the jaws. These bars ensure that the jaws remain parallel when tightened, which is essential for even clamping pressure along the entire length of the workpiece.
Features and Characteristics:
Wooden clamps offer several features and characteristics that make them valuable tools in woodworking and other applications
Strength and Durability: Wooden clamps are renowned for their strength and durability. Their sturdy construction allows them to withstand substantial clamping pressure without deformation.
Gentle Clamping: The wooden jaws are gentle on workpieces, making these clamps suitable for delicate materials like veneers and softwoods. The soft, flat jaws prevent surface damage or indentation.
Adjustability: Wooden clamps are highly adjustable, allowing woodworkers to accommodate various workpiece sizes and shapes. Users can precisely control the clamping pressure by loosening or tightening the screw.
Versatility: These clamps can be used for various applications, including gluing boards, assembling wooden components, holding pieces in place during carving or joinery work, and more.
User-Friendly: Wooden clamps are relatively easy to use, making them accessible to woodworkers of different skill levels, from novices to experienced craftsmen.
How to Use Wooden Clamps:
Using wooden clamps effectively involves the following steps
Open the Clamps: Turn the handles counterclockwise to open the jaws as wide as necessary to accommodate the workpiece.
Position the Workpiece: Place the workpiece between the jaws, making sure it is centered and aligned for your project.
Tighten the Clamps: Turn the handles clockwise to tighten the jaws against the workpiece. Apply enough pressure to secure the workpiece firmly but not so much that it causes damage or deformation.
Check Alignment: Ensure that the workpiece remains aligned and parallel during clamping. You can use a square or other measuring tools to verify alignment.
Perform the Task: With the workpiece securely clamped, proceed with your woodworking tasks, such as gluing, assembly, carving, or other operations.
Release the Clamps: After completing the task, turn the handles counterclockwise to release the clamping pressure and remove the workpiece.
Common Uses of Wooden Clamps:
Wooden clamps find applications in various woodworking tasks and other projects, including
Gluing and Clamping: Wooden clamps are commonly used to hold pieces together while glue dries, ensuring tight and secure joints in furniture and other wooden structures.
Wooden Joinery: They are essential for creating and maintaining precise joinery during projects such as dovetailing, mortise and tenon joints, and box joints.
Assembly Work: Wooden clamps help align and secure components during the assembly of furniture, cabinets, and other wooden structures.
Carving and Sculpting: Woodworkers use clamps to hold workpieces in place while carving, sculpting, or shaping wood.
Veneer Work: When applying veneer or laminates, wooden clamps provide even pressure to ensure a strong bond between the veneer and the substrate.
Hand Planning: Clamps can be used to secure a workpiece to a workbench or sawhorse for hand planning or other tasks that require stability.
32. Bench Dogs
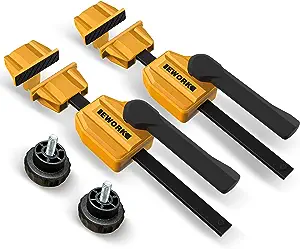 Bench dogs, also known as bench stops or simply dogs, are essential accessories in woodworking that help secure workpieces to a workbench, allowing for more stable and controlled operations. They consist of pegs or cylindrical stops that can be inserted into corresponding holes or dog holes on the workbench’s surface. Bench dogs play a crucial role in keeping workpieces in place during tasks like planning, sawing, chiseling, or sanding. Here’s a comprehensive look at bench dogs:
Components of Bench Dogs:
Bench Dogs: The primary components are the bench dogs themselves, which are often made of hardwood, metal, or plastic. They are cylindrical or peg-like in shape and fit snugly into the dog holes on the workbench’s surface.
Dog Holes: These are holes or depressions in the workbench’s top surface that accommodate the bench dogs. They are strategically placed and spaced to allow flexibility in clamping and securing workpieces of various sizes and shapes.
Holdfasts (optional): Some bench dog systems include holdfasts, which are specialized clamping devices that can be inserted into the dog holes. Holdfasts use a camming mechanism to secure workpieces by clamping them between the holdfast and the bench’s surface.
Features and Characteristics:
Stability: Bench dogs provide excellent stability for workpieces. By engaging one or more bench dogs in the dog holes, you can secure the workpiece and prevent it from shifting or moving during various woodworking operations.
Versatility: Bench dogs are highly versatile, allowing you to hold workpieces of different shapes, sizes, and thicknesses. You can adjust the placement and number of bench dogs to suit your specific needs.
Precision: Bench dogs assist in achieving precise and controlled cuts, ensuring that workpieces are held firmly in place during planning, sawing, chiseling, and other tasks.
Safety: Using bench dogs reduces the risk of accidents by preventing workpieces from slipping, which can lead to injury or errors in your woodworking projects.
Ease of Use: Bench dogs are easy to use and suitable for woodworkers of all skill levels. Inserting or removing them from the dog holes is a straightforward process.
How to Use Bench Dogs:
Dog Hole Placement: Ensure that your workbench has strategically placed and evenly spaced dog holes. These holes should be within easy reach and provide options for securing workpieces of varying sizes.
Select Bench Dogs: Choose the appropriate size and number of bench dogs based on the workpiece you’re using. In general, two or more bench dogs are used to secure a workpiece effectively.
Insert Bench Dogs: Insert the bench dogs into the dog holes on the workbench’s surface. Push them in until they grip the workpiece securely without leaving excessive gaps.
Position the Workpiece: Place your workpiece on the workbench, aligning it with the bench dogs and ensuring that it is held firmly in place.
Engage Holdfasts (if available): If your bench dog system includes holdfasts, use them to clamp the workpiece securely by inserting them into dog holes and engaging the camming mechanism.
Perform the Task: With the workpiece secured by the bench dogs, proceed with your woodworking operation, such as planning, sawing, chiseling, or sanding.
Release the Workpiece: After completing the task, remove the bench dogs from the dog holes and release the workpiece.
Common Uses of Bench Dogs:
Planing: Bench dogs hold a board securely while it’s being planned, ensuring even and consistent removal of material.
Sawing: They provide stability for workpieces when making precise crosscuts or rip cuts with hand saws or power saws.
Chiseling: Bench dogs help secure workpieces for accurate chiseling and mortising operations.
Sanding: They keep boards in place during sanding tasks, ensuring a uniform and smooth surface.
Assembly: Bench dogs assist in aligning and joining components during the assembly of furniture or other wooden structures.
Routing: They provide stability when using a router to create precise dadoes, grooves, and decorative profiles.
33. Wooden Doweling Jig
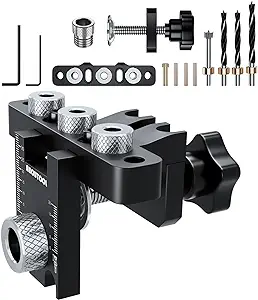 A wooden doweling jig, often simply referred to as a doweling jig, is a versatile and useful tool used in woodworking to create strong and accurate joints using wooden dowels. It is particularly popular for joining pieces of wood seamlessly and securely, making it an essential tool for furniture making, cabinet construction, and other woodworking projects. Here’s a comprehensive look at the wooden doweling jig:
Components of a Wooden Doweling Jig:
Body or Frame: The main structure of the doweling jig is often made of wood, metal, or a combination of materials. It features holes, slots, and guides that allow for precise placement of dowels.
Alignment Guides: Doweling jigs have alignment guides or markers that help woodworkers accurately position the jig on the workpiece, ensuring the dowel holes are precisely located.
Clamping Mechanism: To secure the doweling jig to the workpiece, it may have clamps or other securing mechanisms that prevent movement during the doweling process.
Dowel Holes: The doweling jig features holes or guides where the dowel holes are drilled. These holes are typically spaced to match the size and spacing of dowels used in the project.
Features and Characteristics:
Accuracy: Doweling jigs ensure precise and consistent dowel hole placement, resulting in strong and reliable joints.
Versatility: These jigs can be used with various dowel sizes, allowing woodworkers to accommodate different project requirements.
Strength: Dowel joints created with a doweling jig are known for their strength and durability, making them suitable for load-bearing components in furniture and cabinetry.
Ease of Use: Wooden doweling jigs are relatively easy to use, making them accessible to woodworkers of different skill levels, from beginners to experienced craftsmen.
How to Use a Wooden Doweling Jig:
Select Dowel Size: Choose the appropriate dowel size for your project. Common sizes include 1/4-inch, 3/8-inch, and 1/2-inch dowels, but other sizes are available.
Mark Dowel Locations: Mark the locations where you want to create dowel joints on your workpieces. Ensure that the marks are accurately placed for a precise fit.
Position the Doweling Jig: Align the doweling jig on the workpiece using the alignment guides or markers. Ensure that it is securely clamped or held in place.
Select the Dowel Hole Size: Choose a drill bit that matches the size of the dowel you’re using. Install it in your drill or drill press.
Drill Dowel Holes: Drill dowel holes using the holes or guides on the doweling jig. Make sure to maintain a consistent depth and angle while drilling.
Apply Glue (optional): Apply woodworking glue to the dowel holes and the ends of the dowels before inserting them. This enhances the strength and integrity of the joint.
Insert Dowels: Insert the dowels into the dowel holes on one workpiece. Ensure they fit snugly and align with the corresponding holes on the other workpiece.
Assemble the Joint: Join the two workpieces together, making sure the dowels engage properly in the holes. Clamp or secure the joint until the glue dries (if the glue is used).
Allow the Joint to Cure: If glue is applied, allow the joint to cure fully according to the glue manufacturer’s instructions before using the assembled piece.
Common Uses of Wooden Doweling Jigs:
Furniture Making: Doweling jigs are invaluable for creating strong joints in furniture pieces, such as chairs, tables, and cabinets.
Cabinetmaking: They are commonly used in cabinet construction, helping secure panels, frames, and other components together.
Wooden Joinery: Dowel joints are used to connect wooden components like legs, aprons, and rails in wooden structures.
Repairs: They are used to repair broken wooden joints or to replace damaged or worn dowels in existing furniture.
Decorative Woodworking: Dowel joints can be used to create decorative elements and connections in woodworking projects.
34. Bradawl
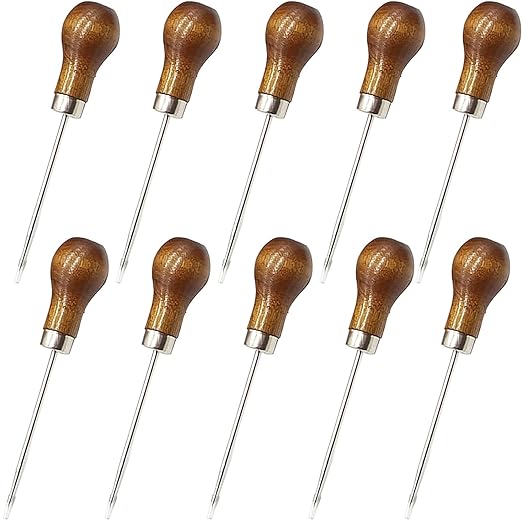 A bradawl, sometimes spelled “brad awl,” is a small, pointed hand tool used in woodworking and other crafts. It’s designed for piercing small holes in wood or other soft materials before driving screws, nails, or making markings. The primary purpose of a bradawl is to create a starting point for fasteners, reducing the risk of splitting the wood and ensuring precise placement. Here’s a comprehensive look at the bradawl:
Components of a Bradawl:
Handle: The handle is usually made of wood or plastic and provides a comfortable grip for the user. Some bradawls have a metal ferrule or collar at the base of the handle, reinforcing the connection between the handle and the shaft.
Shaft: The shaft is a slender, pointed metal rod that tapers to a sharp tip. It’s the working part of the bradawl, used for creating small holes in the material.
Features and Characteristics:
Sharp Point: The pointed tip of a bradawl is incredibly sharp and fine, making it suitable for piercing wood, leather, or other soft materials with minimal effort.
Control: Bradawls provide the user with precise control when making holes. This control is essential for achieving accurate hole placement.
Prevents Splitting: By creating a small pilot hole, a bradawl helps prevent the wood from splitting when you drive screws or nails into it, especially near the edges or ends of the workpiece.
Marking Tool: In addition to hole-making, a bradawl can be used as a marking tool, creating small indents or points to indicate the locations for fasteners or other tasks.
Versatility: Bradawls can be used in various materials, including wood, leather, plastic, and even soft metals, making them versatile tools in different crafts.
Ease of Use: Bradawls are easy to use, making them accessible to people of different skill levels, from beginners to experienced craftsmen.
How to Use a Bradawl:
Select the Workpiece: Choose the piece of wood or material where you need to create a hole or make a marking.
Mark the Location: Use a pencil, marking gauge, or another tool to mark the exact location where you want to create a hole or make an indentation.
Grip the Handle: Hold the handle of the bradawl firmly in your dominant hand. Ensure a comfortable and secure grip.
Position the Bradawl: Place the pointed tip of the Bradawl directly on the marked location on the workpiece.
Apply Pressure: Apply steady downward pressure on the bradawl with your hand. The sharp tip should penetrate the material easily, creating a small hole or indentation.
Remove the Bradawl: Lift the Bradawl out of the material. If you’ve created a hole, it’s now ready for inserting a screw, nail, or other fastener. If you’ve made an indentation, it serves as a reference point for your next action.
Common Uses of Bradawls:
Pre-drilling: They are used to create pilot holes for screws and nails, reducing the risk of splitting the wood and ensuring fasteners go in smoothly.
Marking: Bradawls are used to make small indentations in wood or other materials for marking reference points, alignment, or measurements.
Leatherwork: Leatherworkers use bradawls to create holes in leather for stitching or adding decorative elements.
Model Making: Model builders use bradawls for precise hole-making when assembling miniature structures or vehicles.
Carpentry: Carpenters use bradawls for tasks like aligning hinge screws, marking wood for joinery, and making small adjustments
35. Wooden Mallet
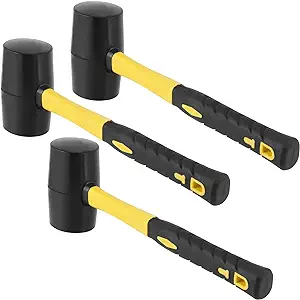 A wooden mallet is a hand tool commonly used in woodworking and other trades. It consists of a wooden head and a handle and serves various purposes, including driving chisels, tapping workpieces, and assembling wooden joinery. The design of a wooden mallet makes it particularly useful for tasks that require controlled force without damaging delicate materials. Here’s a comprehensive look at the wooden mallet:
Components of a Wooden Mallet:
Head: The head of a wooden mallet is typically made of dense hardwood, such as beech, maple, or hickory. It’s designed to be sturdy and provides the weight needed to deliver force without damaging workpieces. The head is usually cylindrical or square in shape with flat faces, which can be of different sizes and hardness depending on the intended use.
Handle: The handle is also made of wood, often the same type as the head, and is attached to the head. It’s designed for a comfortable grip, and its length can vary depending on the specific mallet design.
Features and Characteristics:
Weight and Balance: Wooden mallets are carefully designed to provide a balanced weight distribution that maximizes the force applied to workpieces while minimizing the risk of overstriking or damaging the material.
Soft Striking Surface: The wooden head of the mallet is softer than metal alternatives like hammers. This softness reduces the likelihood of leaving marks or dents on the workpiece, which is especially important when working with delicate materials or intricate joinery.
Controlled Force: Wooden mallets allow users to apply controlled force with precision, making them ideal for tasks like driving chisels, tapping joints together, and adjusting workpieces.
Versatility: Wooden mallets have a wide range of applications, from fine woodworking to carpentry and joinery, as well as leatherwork, blacksmithing, and other trades.
Reduced Vibration: The wood used in the construction of mallets helps absorb some of the shock and vibration generated during use, enhancing user comfort.
Ease of Use: Wooden mallets are easy to use and suitable for individuals of various skill levels, from beginners to experienced craftsmen.
How to Use a Wooden Mallet:
Select the Appropriate Mallet: Choose the right-sized mallet for your task. Larger mallets deliver more force, while smaller ones provide more control.
Secure the Workpiece: Ensure that the workpiece is securely clamped, held in place, or properly supported on a stable surface.
Grip the Handle: Hold the mallet by the handle near the end, ensuring a comfortable and firm grip.
Aim Carefully: Position the striking face of the mallet squarely over the area you intend to strike.
Apply Controlled Force: Use a controlled, downward motion to deliver the necessary force. The mallet’s weight does most of the work.
Observe Caution: Be mindful of your surroundings and keep your fingers and other body parts clear of the path of the mallet.
Common Uses of Wooden Mallets:
Chiseling: They are used to strike chisels, driving them into wood or other materials to create cuts, mortises, and other woodworking details.
Joinery Work: Wooden mallets are invaluable for assembling joinery, like dovetails, where a firm but controlled force is needed to seat joints tightly.
Carving: Woodcarvers use mallets in combination with carving tools to remove material and shape wood.
Leatherwork: In leatherworking, wooden mallets help stamp patterns, set snaps and rivets, and flatten leather.
Blacksmithing: Blacksmiths use wooden mallets to shape hot metal on an anvil without damaging it.
Furniture Making: Wooden mallets are crucial for assembling furniture and driving wooden pegs or dowels into place.
36. Screw Clamps
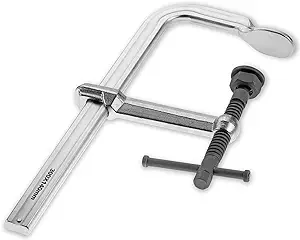 Screw clamps, also known as F-clamps or bar clamps, are versatile tools used in woodworking, metalworking, and various other applications for clamping, securing, and holding workpieces together. They consist of a long, threaded screw mechanism connected to a bar or rail, which can be adjusted to apply pressure, making them essential for tasks like glue-ups, woodworking, welding, and assembly. Here’s a comprehensive look at screw clamps:
Components of Screw Clamps:
Bar or Rail: The bar or rail is the long, straight component of the clamp. It is usually made of materials like steel or aluminum, providing rigidity and stability during clamping. The bar typically has a cross-sectional shape that prevents twisting and flexing.
Screw Mechanism: The screw mechanism is the central part of the clamp, and it is responsible for applying pressure. It consists of a threaded screw and a handle. Turning the handle clockwise tightens the clamp, while turning it counterclockwise releases the pressure.
Jaws: The jaws are the part of the clamp that comes into direct contact with the workpiece. They are typically made of materials like rubber, plastic, or metal, designed to provide a secure and non-marring grip on the workpiece.
Clamping Pads (optional): Some screw clamps have clamping pads that attach to the jaws. These pads help protect the workpiece’s surface from marks or damage during clamping.
Features and Characteristics:
Clamping Capacity: Screw clamps come in various sizes, with differing maximum clamping capacities, allowing users to secure workpieces of various sizes and thicknesses.
Precision: Screw clamps provide precise control over clamping pressure, enabling users to achieve the desired tightness for glue-ups, assembly, and other tasks.
Strength and Durability: These clamps are designed to withstand substantial clamping forces, making them suitable for heavy-duty applications like welding and metalworking.
Non-Marring: The jaws or clamping pads are often designed to be gentle on workpieces, preventing surface damage during clamping.
Versatility: Screw clamps are versatile and can be used in various applications, including woodworking, metalworking, welding, and more.
Adjustability: The clamping bar can be extended or shortened to accommodate different workpiece sizes and shapes, making screw clamps adaptable to different tasks.
How to Use Screw Clamps:
Select the Appropriate Clamp: Choose a screw clamp of the appropriate size and capacity for your task. Ensure it can accommodate the dimensions of your workpiece.
Position the Workpieces: Place the workpieces you want to clamp together in the desired position. Ensure that they are properly aligned and prepared for clamping.
Place the Clamp: Position the jaws of the screw clamp on the workpieces where you want to apply pressure. Ensure the clamping pads, if available, are in the right position to protect the workpiece surface.
Adjust the Screw: Turn the handle of the screw mechanism clockwise to tighten the clamp. Apply enough pressure to securely hold the workpieces together but not so much that it damages the material.
Check Alignment: Verify that the workpieces remain properly aligned and parallel during clamping, making any necessary adjustments if required.
Perform the Task: With the workpieces securely clamped, proceed with the task at hand, such as gluing, assembling, welding, or other operations.
Release the Clamp: After completing the task, turn the handle counterclockwise to release the clamping pressure and remove the clamp.
Common Uses of Screw Clamps:
Woodworking: Woodworkers use screw clamps for tasks like glue-ups, securing pieces during joinery, and clamping wooden panels during assembly.
Metalworking: Metalworkers rely on screw clamps to hold metal components in place during welding, cutting, and shaping operations.
Construction: In construction, screw clamps are used to secure materials like lumber and scaffolding, ensuring they remain in place.
Cabinetmaking: Cabinetmakers use screw clamps for assembling cabinet components and securing joints.
Welding: Welders use screw clamps to hold metal pieces together while welding, ensuring proper alignment and strong welds.
General Clamping: Screw clamps are employed in a wide range of DIY projects and general clamping tasks, making them a versatile tool for various applications.
37. Cauls
Cauls, sometimes called clamping cauls or simply clamps, are tools used in woodworking and various other applications to ensure even pressure and proper alignment during glue-ups and clamping tasks. They are typically flat, straight, and rigid boards or bars that are placed on either side of a glued joint to distribute pressure evenly and prevent warping, bowing, or uneven glue lines in the workpiece. Cauls play a crucial role in achieving strong and well-aligned joints in woodworking and other projects. Here’s a comprehensive look at caul tools:
Components of Cauls:
Board or Bar: The main part of a caul is a flat and straight board or bar. These are usually made of materials like hardwood, plywood, or aluminum. The caul’s length and width can vary depending on the specific application and the size of the workpiece.
Clamping Mechanism (optional): Some caul setups may incorporate clamps to hold the caul in place. These clamps can be bar clamps, F-clamps, or other types of clamping tools, ensuring that the cauls remain firmly pressed against the glued joint.
Features and Characteristics:
Even Pressure: Cauls help distribute clamping pressure evenly across the glued joint, minimizing the risk of misalignment or uneven glue lines.
Prevent Warping: Using cauls prevents the workpiece from warping or bowing when pressure is applied during glue-ups, ensuring a flat and stable result.
Precise Alignment: Cauls help maintain precise alignment between workpiece components, such as the edges of boards in a panel glue-up.
Reduction of Glue Squeeze-Out: By distributing pressure evenly, cauls can help control the amount of excess glue that squeezes out of the joint, reducing the need for cleanup.
Surface Protection: The flat surface of a caul helps protect the workpiece from damage, preventing marks or indentations caused by the pressure from clamps or other tools.
Versatility: Cauls are versatile and can be used in various woodworking applications, including panel glue-ups, edge-to-edge joining, veneering, and more.
Durability: Well-maintained caul boards or bars can last for many years, providing reliable clamping assistance throughout their lifespan.
How to Use Cauls:
Prepare the Workpieces: Before gluing, ensure that the workpieces are properly prepared, including joint edges that are flat, clean, and appropriately glued.
Apply Glue: Apply glue to the joint edges, ensuring an even and sufficient coat.
Position the Cauls: Place the cauls on both sides of the glued joint, aligning them to distribute pressure evenly. If needed, use clamps to secure the cauls in place.
Add Clamps (optional): If you’re using clamps to apply pressure, position them on top of the cauls, directly over the joint.
Tighten Clamps: If using clamps, tighten them to apply pressure gradually and evenly across the joint. Ensure that the joint remains well-aligned.
Check Alignment: Verify that the workpieces remain aligned and flat during the clamping process.
Allow Glue to Dry: Leave the clamped assembly undisturbed to allow the glue to dry and create a strong bond.
Remove Cauls and Clamps: Once the glue has fully cured, remove the cauls and clamps from the workpiece.
Common Uses of Cauls:
Panel Glue-Ups: Cauls are essential for joining individual boards together to create panels, tabletops, or large workpiece assemblies.
Edge Gluing: Woodworkers use cauls when gluing the edges of boards together to form wider panels.
Veneering: Cauls help evenly distribute pressure when applying veneer to a substrate, ensuring a strong and flat bond.
Laminating: In laminating projects, cauls maintain alignment and pressure when bonding multiple layers of materials together.
Miter Joint Gluing: When joining mitered corners, cauls ensure precise alignment and pressure distribution.
Bending Wood: Cauls are used in steam bending and other processes that require even pressure to shape or bend wood.
38. Flush-Cut Saw
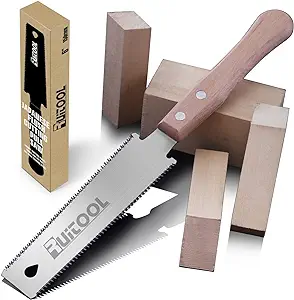 A flush-cut saw, also known as a flush-cutting saw or pull saw, is a specialized hand tool designed for trimming or cutting material flush with a surface. It’s particularly useful in woodworking and carpentry for tasks that require clean, precise cuts, such as trimming dowels, cutting off protruding tenons, or removing excess material in tight spaces. Here’s a comprehensive look at the flush-cut saw:
Components of a Flush-Cut Saw:
Blade: The blade of a flush-cut saw is thin and flexible, often made of high-quality steel or other metals. It has fine teeth that cut on the pull stroke, making it ideal for precision work.
Handle: The handle of the saw is typically ergonomic and comfortable to hold. It’s designed for a secure grip, allowing the user to control the saw with precision.
Features and Characteristics:
Pull Stroke: Flush-cut saws are designed to cut on the pull stroke. This design reduces the risk of splintering or tearing the material’s surface, resulting in a cleaner cut.
Thin Blade: The thin, flexible blade allows for precise and fine cuts, making it ideal for flush trimming tasks.
Offset Handle: Some flush-cut saws have an offset handle, which enables the user to work in tight spaces without the handle interfering with the surface.
Double-Sided Blade (optional): Some flush-cut saws have a double-sided blade with teeth on both edges, providing versatility for different cutting directions.
Versatility: These saws can be used on various materials, including wood, plastic, and soft metals.
Accuracy: Flush-cut saws excel at making accurate cuts along surfaces, ensuring a smooth and professional finish.
How to Use a Flush-Cut Saw:
Mark the Cut: Mark the line where you want to make your cut on the material. Ensure the mark indicates the point where you want the material to be flush with the surface.
Position the Saw: Place the flush-cut saw on the material, aligning it with your marked line. Ensure that the saw teeth face away from the surface you want to keep.
Start the Cut: Gently pull the saw towards you in a slow and controlled manner. Begin the cut on the pull stroke, allowing the saw teeth to start making contact with the material.
Maintain Alignment: Keep the saw aligned with your marked line to ensure a clean and flush cut. Maintain a steady pace to avoid damaging the surface.
Complete the Cut: Continue pulling the saw along the material until you’ve cut all the way through or achieved the desired flush surface. Stop the cut as soon as the saw has done its job.
Remove Excess Material: Once the cut is complete, remove any excess material and smooth the surface as needed.
Common Uses of Flush-Cut Saws:
Trimming Dowels: Woodworkers use flush-cut saws to trim dowels or wooden plugs that have been inserted into holes to hide screws or imperfections.
Cutting Tenons: These saws are handy for trimming tenons or protruding joints in woodworking projects like furniture making.
Flooring Installation: Flush-cut saws are used to trim the bottom of door jambs or casings when installing hardwood or laminate flooring.
Carpentry: Carpenters use flush-cut saws to cut excess material on framing, trim, or moldings for a neat and flush finish.
Model Making: Model builders and hobbyists use flush-cut saws for intricate cuts on miniature projects.
PVC and Plastic Trimming: In plumbing and other trades, flush-cut saws are used for the precise trimming of plastic pipes and fittings.
39. Rabbet Plane
A rabbet plane, also known as a rebate plane, is a specialized hand tool used in woodworking to create rabbets, which are rectangular recesses or notches cut into the edge or face of a wooden workpiece. Rabbets are commonly used in joinery to accommodate the mating pieces of another component, such as the lip of a drawer bottom fitting into the sides or the back panel of a cabinet fitting into its sides. Here’s a comprehensive look at the rabbet plane:
Components of a Rabbet Plane:
Body: The body of the rabbet plane is often made of wood, though some modern versions may incorporate metal or composite materials. It provides the structure and support for the other components of the plane.
Blade: The blade of the rabbet plane is made of high-carbon steel and is responsible for cutting the rabbet. It is typically embedded in the body at a fixed angle or adjustable angle, depending on the plane’s design.
Fence or Depth Stop: The fence is an integral part of the rabbet plane, used to guide the plane along the edge of the workpiece, maintaining a consistent width for the rabbet. Some rabbet planes also feature a depth stop that allows for precise control over the rabbet’s depth.
Adjustment Mechanism: This component allows users to adjust the blade’s depth of cut. The mechanism can be fine-tuned to achieve the desired rabbet size and depth.
Handle and Knob: The handle and knob provide a comfortable grip for the user, allowing for better control and maneuverability during the planning process.
Features and Characteristics:
Versatility: Rabbet planes can create rabbets of various sizes and depths, making them versatile for a wide range of woodworking projects.
Precision: These planes allow for precise and controlled cutting, ensuring that the rabbets fit snugly with mating components.
Clean Cuts: Rabbet planes produce clean and smooth rabbet edges, which is important for the quality and appearance of woodworking joints.
Adjustability: Some rabbet planes have adjustable blades and fences, giving users the flexibility to tailor the rabbet’s dimensions to their specific needs.
Sturdy Construction: High-quality rabbet planes are built to be robust and durable, ensuring they withstand the demands of heavy-duty woodworking.
How to Use a Rabbet Plane:
Mark the Rabbet Location: Determine the location and dimensions of the Rabbet on your workpiece. Mark the width and depth of the rabbet using a square or marking gauge.
Set the Rabbet Plane: Adjust the blade depth and fence of the Rabbet plane to match the desired Rabbet dimensions. Make sure the plane is set up accurately.
Secure the Workpiece: Clamp the workpiece to a workbench or other stable surface to prevent movement during planning.
Begin Planning: Start at one end of the marked rabbet and guide the rabbet plane along the edge of the workpiece. Apply even and firm pressure as you push the plane forward.
Repeat Passes: Depending on the desired rabbet depth, you may need to make multiple passes. Gradually increase the depth of the blade with each pass until you achieve the desired rabbet size and depth.
Check Dimensions: Periodically check the rabbet’s dimensions to ensure they match your markings and requirements.
Fine-Tune as Needed: If adjustments are necessary, fine-tune the rabbet plane’s settings and continue planning.
Finish and Smooth: Once you’ve achieved the desired rabbet size and depth, use a chisel, file, or sandpaper to smooth and clean the rabbet’s surfaces.
Common Uses of Rabbet Planes:
Joinery: Creating rabbets is crucial for forming strong and precise woodworking joints, such as dadoes, rebates, and lap joints.
Cabinetmaking: Rabbet planes are used to cut rabbets for assembling cabinet components, drawers, and doors.
Window and Door Construction: These planes help prepare components for windows and doors, ensuring proper fitting and assembly.
Frame Construction: In picture frame making, rabbet planes are used to cut rabbets for securing glass and artwork within the frame.
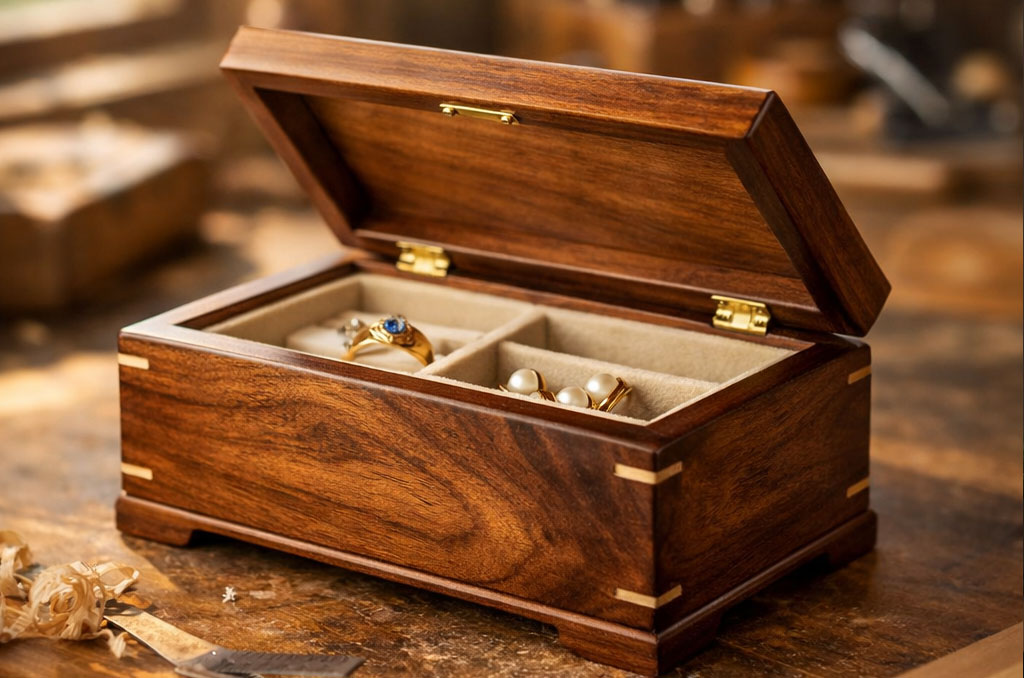
Box Making: Woodworkers use rabbet planes to form rabbets for assembling boxes and other small containers.
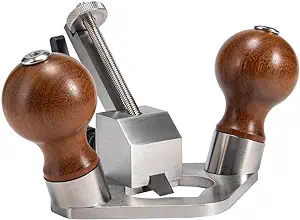
40. Router Plane
 A router plane is a specialized hand tool used in woodworking for precise and controlled depth routing or leveling tasks. It’s particularly valuable for tasks that require removing a specific amount of material from the surface of a workpiece to create a flat and even plane. Router planes come in various sizes and designs, but they all share the same basic function. Here’s a comprehensive look at the router plane:
Components of a Router Plane:
Body: The body of the router plane is usually made of metal, often cast iron or steel. It provides the structural support and rigidity needed for accurate routing.
Blade or Iron: The blade, also called the iron, is the cutting component of the router plane. It is made of high-carbon steel and has a sharpened edge that removes material during routing.
Depth Adjustment Mechanism: The router plane features an adjustment mechanism that allows the user to set the blade’s depth accurately. This mechanism may involve a depth stop or a screw to control the blade’s position.
Handle: The handle provides a comfortable and secure grip for the user, facilitating precise control during routing.
Features and Characteristics:
Precision: Router planes are known for their precision in achieving consistent and controlled depths, making them ideal for tasks requiring flat and even surfaces.
Depth Control: The depth adjustment mechanism allows users to set the cutting depth with great accuracy, whether for shallow or deep rooting.
Flat Base: Router planes typically have a flat and wide base, which provides stability and ensures the plane maintains contact with the workpiece during routing.
Versatility: Router planes are versatile tools and can be used for a wide range of tasks, including cleaning up dadoes, grooves, and tenon shoulders, as well as leveling surfaces.
Durability: High-quality router planes are built to be robust and durable, ensuring they can withstand the demands of woodworking.
How to Use a Router Plane:
Mark the Routing Area: Determine the area on the workpiece that requires material removal. Mark the boundaries of the routed area with clear and precise markings.
Set the Router Plane: Adjust the router plane’s blade depth to match the desired depth of cut. Use the depth adjustment mechanism to achieve the right setting.
Secure the Workpiece: Clamp the workpiece to a stable surface or workbench to prevent movement during routing. Ensure it is firmly secured and aligned with the markings.
Begin Routing: Place the base of the router plane on the workpiece, aligning it with the marked area. Hold the handle securely and begin to make passes across the marked area. Start with light passes and gradually increase the depth of cut as needed.
Repeat Passes: Depending on the depth and the thickness of the material to be removed, you may need to make multiple passes. Ensure that each pass is even and controlled.
Check Dimensions: Periodically check the dimensions and depth of the routed area to ensure it matches your markings and requirements.
Fine-Tune as Needed: If adjustments are necessary, fine-tune the router plane’s settings and continue routing.
Complete the Routing: Once the routed area matches the desired dimensions, stop routing. You can clean up the routed surface as needed using other tools like chisels or sandpaper.
Common Uses of Router Planes:
Dadoes and Grooves: Woodworkers use router planes to clean up and ensure precise dimensions of dadoes and grooves in joinery work.
Tenon Shoulders: Router planes help level and clean up the shoulders of tenons for snug and precise joinery fits.
Flatten Surfaces: They are used to level and flatten large or small surfaces, such as tabletops, shelves, or the bottoms of wooden boxes.
Hinge Mortises: Router planes can create clean and precise mortises for hinges or locks.
Decorative Edge Routing: Some router planes have specialized cutters for decorative edge profiles and chamfers.
| See more woodworking tools 41 to 50 |


1 comment on “50 Essential Hand Tools 31 to 40”