| Return to woodworking tools 1 to 10 |
11. Claw hammer:
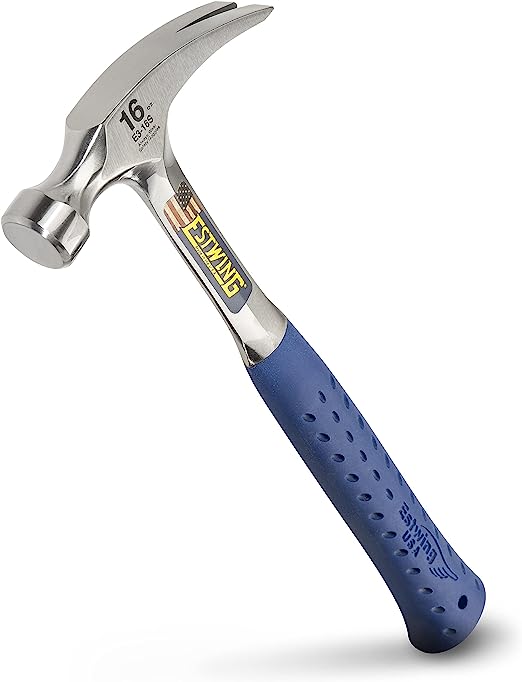 The claw hammer is a ubiquitous and essential hand tool, commonly found in households, workshops, and construction sites around the world. It serves a primary purpose: to drive and remove nails. The claw hammer’s design is simple yet highly effective, making it a versatile and indispensable tool for various DIY and construction projects.
Components of a Claw Hammer:
Head: The head of a claw hammer is typically made of hardened steel. It has two main parts: the flat face and the curved claw. The flat face is used for driving nails into various materials, while the claw end is used for removing nails.
Handle: The handle of a claw hammer is traditionally made of wood, but modern versions may have handles made from materials like fiberglass or steel. The handle provides a comfortable grip for the user and absorbs some of the shock generated when striking objects.
Key Features of a Claw Hammer:
Balance: A well-designed claw hammer has a balanced weight distribution between the head and the handle. This balance allows for better control and accuracy when driving or removing nails.
Curved Claw: The claw’s curved shape is essential for gripping and extracting nails. It acts like a lever, allowing you to apply force in a controlled manner to remove nails from wood or other materials.
Types of Claw Hammers:
Rip Claw Hammer: This is the most common type of claw hammer, recognized by its straight, flat claw. It is suitable for general-purpose tasks like framing, construction, and DIY projects.
Curved Claw Hammer: This type has a curved claw, providing more nail removal leverage. It is commonly used for tasks requiring prying out nails or other fasteners.
Framing Hammer: Framing hammers are heavy-duty claw hammers designed for framing and construction work. They often have a longer handle and a milled face on the head for better grip on nails.
Uses of a Claw Hammer:
Driving Nails: The primary function of a claw hammer is to drive nails into various materials, such as wood, drywall, or even metal. The flat face of the hammerhead provides a solid and controlled impact, allowing you to sink nails accurately.
Removing Nails: The curved claw end of the hammer is ideal for removing nails from wood or other surfaces. You can pull out nails with relative ease by positioning the claw around the nail head and leveraging it gently.
Demolition Work: Claw hammers are also useful in demolition projects. You can use the claw to pry apart materials, dismantle structures, or remove stubborn nails and screws.
Minor Adjustments: The hammer can be used for minor adjustments or alignments in woodworking projects, making it a versatile tool for precision work.
12. Tape measure:
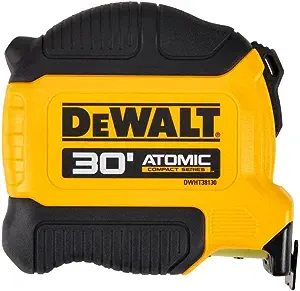 A tape measure is a versatile and indispensable tool used for measuring various distances, dimensions, and lengths. It consists of a long, flexible tape marked with linear measurements and a case that houses the tape and facilitates easy retraction. Here’s a detailed look at tape measures:
Components of a Tape Measure:
Tape: The tape is typically made of flexible material like steel, fiberglass, or cloth, marked with measurements in both imperial (inches or feet) and metric (centimeters or meters) units. The tape extends from the case and is designed to be pulled out and used for measuring.
Case: The case houses the tape and protects it from damage and dirt. It is usually made of plastic or metal and is designed to be portable and durable.
Locking Mechanism: Many tape measures come equipped with a locking mechanism that allows the tape to stay extended without the need to hold it manually. This feature enhances convenience when measuring longer distances.
Hook: At the end of the tape, there is often a metal or plastic hook that can be hooked onto an edge or object to facilitate accurate measurements. This hook can move slightly to compensate for its thickness, ensuring precise measurements whether you’re measuring from the inside or outside of an object.
Types of Tape Measures:
Standard Tape Measure: These are the most common types, typically available in various lengths, such as 12, 16, or 25 feet. They are used for general-purpose measurements.
Long Tape Measure: Designed for longer measurements, long tape measures can extend up to 100 feet or more. They often have a reel or crank handle for easy winding.
Digital Tape Measure: Modern variations feature a digital display that provides precise measurements in multiple units. Some digital tape measures may include additional features like memory storage and calculation functions.
How to Use a Tape Measure:
Extending the Tape: Hold the case in one hand and pull out the tape with the other. Ensure it is fully extended without any kinks or twists.
Taking Measurements: Press the hook at the end of the tape against the object you’re measuring, ensuring it hooks securely. Then, read the measurement where the tape meets the edge of the object. Take care to read it accurately, as even a slight misalignment can affect the measurement.
Locking the Tape: If your tape measure has a locking mechanism, engage it to keep the tape extended without the need to hold it. This is particularly useful for one-person measurements.
Retracting the Tape: After you’ve taken your measurement, press the release button (if available) or gently guide the tape back into the case, avoiding any sudden snapping or damage.
Common Uses of Tape Measures:
Construction: Tape measures are extensively used in construction for measuring dimensions, ensuring precise cuts, and checking layout accuracy.
Carpentry and Woodworking: Woodworkers rely on tape measures to measure and cut wood accurately for various projects.
Home Improvement: Whether you’re installing new furniture, curtains, or shelving, tape measures help ensure that everything fits perfectly.
Tailoring: In the fashion industry, tape measures are essential for taking body measurements and creating patterns.
DIY Projects: For hobbyists and DIY enthusiasts, tape measures are indispensable for a wide range of projects, from gardening to home decor.
13. Screwdrivers:
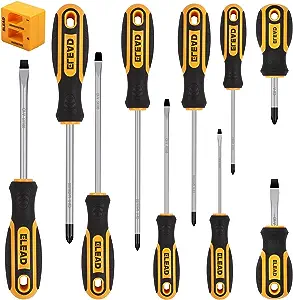 Screwdrivers are essential hand tools used for turning screws, bolts, and other fasteners. They come in various shapes and sizes, each designed for specific applications. Here’s a comprehensive look at screwdrivers:
Components of a Screwdriver:
Handle: The handle of a screwdriver is typically made of materials like wood, plastic, rubber, or metal. It provides a grip for the user and is often designed for ergonomic comfort.
Shaft (Shank): The shaft is the long, slender part of the screwdriver that connects the handle to the tip. It transfers the torque applied to the handle to the screw or fastener.
Tip (Bit): The tip or bit is the working end of the screwdriver. It fits into the screw’s groove or recess to turn it. The shape of the tip varies according to the type of screwdriver and the type of screw it’s designed for.
Types of Screwdrivers:
Flathead Screwdriver (Slotted Screwdriver): Recognizable by its flat, blade-like tip, the flathead screwdriver is used for screws with a single, straight-line groove. It’s a versatile tool commonly found in many toolkits.
Phillips Screwdriver: Identified by its cross-shaped tip, the Phillips screwdriver is designed for screws with corresponding cross-shaped recesses. It offers improved grip and reduced cam-out (slipping) compared to flathead screwdrivers.
Torx Screwdriver: Torx screwdrivers are used with screws featuring a six-pointed star-shaped recess. They provide excellent torque and are common in electronics and automotive applications.
Robertson Screwdriver: Popular in Canada and known for its square tips, the Robertson screwdriver offers excellent torque and is less prone to cam-out.
Hex Key (Allen Wrench): Hex keys, often in the form of L-shaped wrenches, are used with hexagonal socket screws and bolts. They come in various sizes.
Precision Screwdriver: These small screwdrivers are designed for delicate tasks such as working with electronics or watches. They feature very fine tips for intricate work.
Additional Features and Variations:
Magnetic Tips: Some screwdrivers have magnetic tips to hold screws in place, making it easier to position them in tight spaces.
Ratcheting Screwdrivers: These screwdrivers have a ratcheting mechanism in the handle, allowing for faster and more efficient screw turning, especially in confined spaces.
How to Use a Screwdriver:
Select the Right Screwdriver: Choose the screwdriver with the appropriate tip for the screw you need to work with.
Align the Screwdriver: Ensure that the screwdriver’s tip aligns perfectly with the screw’s recess to prevent damage to both the screw and the screwdriver.
Apply Torque: Apply downward pressure and turn the screwdriver clockwise to tighten or counterclockwise to loosen the screw.
Maintain Pressure: Maintain consistent pressure on the screw while turning to prevent slipping or stripping of the screw head.
Secure the Screw: If the screw is small or difficult to handle, a magnetic or precision screwdriver can help you position it accurately.
Common Uses of Screwdrivers:
Assembling and Disassembling: Screwdrivers are essential for assembling furniture, electronics, appliances, and other items. They are equally valuable for disassembling objects for maintenance or repairs.
Home Repairs: Screwdrivers are frequently used for various household repairs, such as tightening loose cabinet knobs, fixing door hinges, and replacing light switch plates.
Automotive Maintenance: Mechanics use screwdrivers for tasks like removing interior panels, tightening or loosening screws, and changing spark plugs.
Electronics and Gadgets: Precision screwdrivers are vital for opening and repairing smartphones, laptops, and other electronic devices.
Carpentry and Woodworking: Screwdrivers are used to fasten hinges, handles, and other hardware in woodworking projects.
14. Mallet
 A mallet is a simple yet versatile hand tool used for striking and hitting objects, typically to drive other tools or materials, such as chisels, carving tools, or wooden joints. Mallets come in various shapes, sizes, and materials to suit different tasks and materials. Here’s a comprehensive look at mallets:
Components of a Mallet:
Head: The head of a mallet is the striking part that makes contact with the object or tool. It is usually made of a dense and non-metallic material, such as wood, rubber, plastic, or rawhide. The choice of material depends on the specific application and the impact required.
Handle (Haft): The handle, also known as the haft, is the part of the mallet that provides a grip for the user. It is usually made of wood, fiberglass, or metal. The handle’s length can vary, and it may be curved or straight, depending on the type of mallet.
Types of Mallets:
Wooden Mallet: These mallets have heads made of wood, which is ideal for tasks that require controlled and gentle impacts. Wooden mallets are commonly used in woodworking and joinery to drive chisels and other tools without damaging them or the workpiece.
Rubber Mallet: Rubber mallets have heads made of rubber or a rubber-like material. They are used when a softer blow is needed to prevent damage to delicate surfaces or materials. For example, rubber mallets are often used in automotive and metalworking applications.
Plastic Mallet: Plastic mallets are similar to rubber mallets but are made of plastic materials. They offer a balance between hardness and softness and are used in a variety of tasks, including sheet metal work and jewelry making.
Rawhide Mallet: Rawhide mallets have heads made from layers of rawhide leather that are tightly bound together. They are used for shaping metal and jewelry work, providing a softer blow than metal or steel hammers.
Dead Blow Mallet: Dead blow mallets have a hollow head filled with steel or lead shot. This design minimizes rebound and provides a more controlled, non-bouncing strike. They are often used in automotive and construction work.
How to Use a Mallet:
Select the Right Mallet: Choose a mallet that is appropriate for the task and the material you are working with. Consider factors such as the hardness of the material, the desired impact force, and any surface protection requirements.
Grip the Handle: Hold the mallet by its handle, making sure to maintain a firm and controlled grip. Position your hand near the top of the handle for better control and accuracy.
Aim and Strike: Align the head of the mallet with the target or tool you intend to strike. Use a controlled and accurate swing to deliver the necessary impact force. For precise work, adjust the force of your strike as needed.
Common Uses of Mallets:
Woodworking: Wooden mallets are commonly used in woodworking to drive chisels, mortise and tenon joints, and other hand tools without damaging the workpiece.
Metalworking: Mallets are used in metalworking to shape and form metal sheets and components. Rubber and plastic mallets are often used to avoid marring the metal surface.
Construction: Mallets are used in construction for various tasks, including aligning and tapping wooden joints, installing flooring, and adjusting metal frames.
Automotive: Dead-blow mallets are frequently used in automotive repair and maintenance to dislodge parts or align components.
Jewelry Making: Jewelers use rawhide and plastic mallets to shape and manipulate metal for crafting jewelry.
15. Block plane
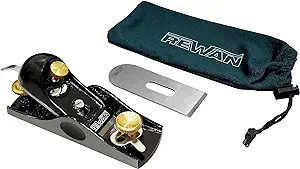 A block plane is a versatile hand tool commonly used in woodworking for a variety of tasks, especially when precision and control are required. It’s a compact and handy tool known for its ability to smooth and shape wood surfaces, remove thin layers of material, and even perform some light trimming and chamfering. Let’s explore the key aspects of block planes:
Components of a Block Plane:
Body: The body of a block plane is typically made of cast iron or other heavy materials to provide stability and reduce vibration during use. The body has a flat sole that rests on the wood surface.
Blade (Cutter): The blade, also called the cutter or iron, is the sharp, flat, and wide cutting edge of the block plane. It is typically made of high-carbon steel or other durable materials. The blade can be adjusted in and out of the plane to control the depth of the cut.
Cap Iron (Chip Breaker): The cap iron, also known as the chip breaker, is a small metal piece that fits on top of the blade. Its primary purpose is to break wood shavings and prevent them from clogging the throat of the plane. It also helps in achieving a cleaner and smoother cut.
Knob and Tote: Some block planes have a knob (front handle) and a tote (rear handle) that allow the user to grip the plane comfortably and guide it effectively. These handles may be made of wood or plastic.
Types of Block Planes:
Standard Block Plane: This is the most common type of block plane, featuring a blade angled at approximately 20 degrees. It’s suitable for general-purpose work, such as smoothing, chamfering, and trimming.
Low-Angle Block Plane: Low-angle block planes have a blade angle of around 12 degrees, which makes them ideal for end-grain work and tasks that require a shallower cutting angle.
Adjustable Mouth Block Plane: Some block planes allow you to adjust the size of the mouth (the opening in front of the blade). This feature provides control over the size of wood shavings and the type of cut you want to achieve.
How to Use a Block Plane:
Prepare the Wood Surface: Ensure the wood you’re working on is properly secured and free of any defects or irregularities.
Set the Blade: Adjust the blade’s depth by turning the adjustment knob or lever on the plane’s body. Start with a shallow cut and gradually increase the depth until you achieve the desired result.
Position the Plane: Hold the plane by the knob and tote and position it on the wood surface with the blade facing forward.
Start Planning: Begin pushing the plane forward in the direction of the wood grain. Apply even pressure to the knob and tote while keeping the sole of the plane flat on the wood.
Finish the Pass: Complete the pass, making sure to maintain a consistent and controlled movement. Lift the plane off the wood surface at the end of the pass to avoid creating unwanted marks.
Repeat as Needed: Continue planning in multiple passes until you achieve the desired smoothness or shape on the wood.
Common Uses of Block Planes:
Smoothing: Block planes are excellent for smoothing the surface of wooden boards, removing rough spots, and eliminating small imperfections.
Chamfering: They are used to create chamfers or beveled edges on wood for decorative or functional purposes.
End-Grain Work: Low-angle block planes excel at end-grain work, such as shaping the edges of wooden pieces and cleaning up end-grain surfaces.
Trimming: Block planes are useful for trimming wood edges or removing excess material, making them handy for fitting joints or leveling edges.
Shaping: Woodworkers often use block planes for shaping small wooden components and achieving precise angles and curves
16. Bench plane
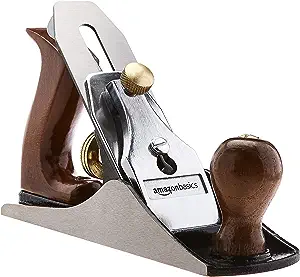 A bench plane is a classic woodworking hand tool designed for flattening, smoothing, and shaping wooden surfaces. It’s an essential tool in the arsenal of both professional woodworkers and hobbyists. Bench planes come in various sizes and types, each tailored to specific tasks. Here’s a comprehensive look at bench planes:
Components of a Bench Plane:
Body: The body of a bench plane is typically made of cast iron or other heavy materials to provide stability and reduce vibration during use. It has a flat sole that rests on the wood surface.
Blade (Cutter): The blade, also known as the cutter or iron, is the sharp, wide, and flat cutting edge of the bench plane. It is typically made of high-carbon steel or other durable materials. The blade can be adjusted in and out of the plane to control the depth of the cut.
Cap Iron (Chip Breaker): The cap iron, also called the chip breaker, is a small metal piece that fits on top of the blade. Its primary purpose is to break wood shavings and prevent them from clogging the throat of the plane. It also helps in achieving a cleaner and smoother cut.
Frog: The frog is an adjustable part inside the plane that holds the blade at a specific angle. It allows for fine-tuning of the blade’s position and angle to control the depth and type of cut.
Adjustment Mechanisms: Bench planes typically have various adjustment mechanisms, including depth adjustment knobs, lateral adjustment levers, and blade retention mechanisms, all designed to ensure precision and control during use.
Types of Bench Planes:
Jack Plane (No. 5): The jack plane is a versatile, medium-sized plane suitable for rough and general-purpose work. It can remove large amounts of wood quickly and is often used for initial flattening and shaping.
Smoothing Plane (No. 4): Smoothing planes are smaller and designed for creating smooth, finished surfaces. They excel at removing fine shavings and producing a glass-like finish on wood.
Jointer Plane (No. 7 or 8): Jointer planes are longer and used for straightening long edges or surfaces, such as boards for joinery. They are essential for creating flat and square edges.
Fore Plane (No. 6): The fore plane is a medium-sized plane that combines features of both the jack and jointer planes. It’s suitable for rough work and can also flatten and true edges.
Block Plane: While not technically a bench plane, the block plane is a smaller, handheld plane used for chamfering, smoothing end grain, and performing detail work.
How to Use a Bench Plane:
Prepare the Wood Surface: Ensure the wood you’re working on is properly secured and free of any defects or irregularities.
Set the Blade: Adjust the blade’s depth using the adjustment mechanisms on the plane. Start with a shallow cut and gradually increase the depth as needed.
Position the Plane: Hold the plane firmly with both hands—one hand on the tote (rear handle) and the other on the front knob. Position the plane on the wood surface with the blade facing forward.
Begin Planning: Push the plane forward in the direction of the wood grain, applying even pressure to the tote and knob while keeping the sole of the plane flat on the wood.
Finish the Pass: Complete the pass, maintaining a consistent and controlled movement. Lift the plane off the wood surface at the end of the pass to avoid creating unwanted marks.
Repeat as Needed: Continue planning in multiple passes until you achieve the desired smoothness or shape on the wood.
Common Uses of Bench Planes:
Flattening Surfaces: Bench planes are used to flatten and level wooden surfaces, ensuring they are smooth and free of imperfections.
Smoothing Wood: Smoothing planes create a fine, polished finish on wood, making it ready for staining, finishing, or further work.
Jointing Edges: Jointer planes are essential for straightening and squaring the edges of boards, a crucial step in joinery and woodworking.
Shaping and Chamfering: Bench planes can be used to shape and chamfer edges, create bevels, and round over corners.
Removing Excess Material: These planes excel at removing excess material, such as when fitting parts or achieving precise dimensions in woodworking projects.
17. Handsaw
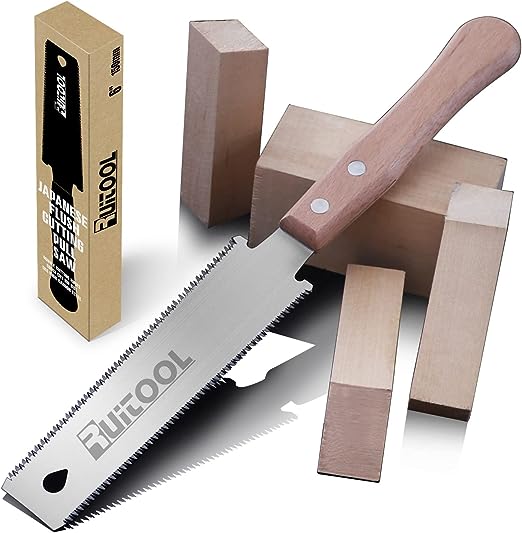 A handsaw is a simple yet indispensable manual cutting tool used for making straight or curved cuts in wood, plastic, and other materials. It consists of a sharp, toothed blade attached to a handle, and it’s operated by hand. Handsaws are available in various types, each designed for specific cutting tasks. Here’s a comprehensive look at handsaws:
Components of a Handsaw:
Blade: The blade is the most critical component of a handsaw. It is typically made of steel and features teeth along one edge, which do the cutting. The type, size, and shape of the teeth vary depending on the saw’s purpose.
Handle: The handle, also known as the grip, provides a comfortable and secure hold for the user. Handles can be made from wood, plastic, or other materials and are designed ergonomically for ease of use.
Types of Handsaws:
Crosscut Saw: Crosscut saws have teeth with multiple sharp points designed to cut across the grain of wood. They produce clean and precise cuts and are commonly used for cutting wood to length.
Rip Saw: Rip saws have fewer, larger teeth with a chisel-like shape. They are used for cutting along the grain of wood, making them suitable for ripping boards and planks.
Backsaw: Backsaws are characterized by a rigid spine or “back” along the top edge of the blade, which prevents it from bending during cuts. They are ideal for making precise and controlled cuts in woodworking and joinery.
Dovetail Saw: A type of backsaw with fine teeth and a thin blade, dovetail saws are specifically designed for making intricate cuts, such as dovetail joints in woodworking.
Coping Saw: Coping saws have a thin, narrow blade stretched between a U-shaped frame. They are used for making intricate curved cuts, often used in woodworking for shaping joints and fine details.
Tenon Saw: Tenon saws are backsaws designed for cutting tenons, which are protruding wood joints used in carpentry and joinery. They have a relatively fine tooth pattern and a rigid back.
Hacksaw: Hacksaws are designed for cutting metal. They have fine, hardened teeth and are commonly used in metalworking and plumbing.
Japanese Pull Saw: These saws cut on the pull stroke rather than the push stroke, as in Western saws. They come in various types for different tasks and are known for their precision and clean cuts.
How to Use a Handsaw:
Choose the Right Saw: Select the appropriate handsaw for your specific cutting task based on the material and type of cut you need to make.
Mark the Cut Line: Use a pencil or marking tool to draw a straight or curved line on the material, indicating where you want to cut.
Secure the Material: Ensure the material you’re cutting is firmly secured in place, either with clamps or a workbench, to prevent movement during cutting.
Position the Saw: Hold the saw by the handle with your dominant hand and place the blade against the material at the starting point of the cut. Angle the saw slightly to begin the cut.
Start Cutting: Begin making controlled, steady strokes with the saw. For crosscuts, apply slight pressure on the forward stroke and ease off slightly on the return stroke. For rip cuts, focus on maintaining a straight line.
Finish the Cut: Continue sawing along the marked line until you’ve completed the cut. Take your time and use controlled strokes to maintain accuracy.
Common Uses of Handsaws:
Woodworking: Handsaws are widely used in woodworking for cutting and shaping wood pieces, whether for furniture, cabinetry, or general construction.
Construction: In construction, handsaws are used for framing, cutting lumber, and performing various tasks that require precise cuts.
Plumbing: Hacksaws are employed in plumbing for cutting pipes and tubing made of metal or plastic.
Metalworking: Handsaws, particularly hacksaws, are used in metalworking for cutting and shaping metal pieces.
DIY and Home Improvement: Handsaws are versatile tools for various DIY projects, such as cutting trim, molding, and other materials.
18. Files and rasps
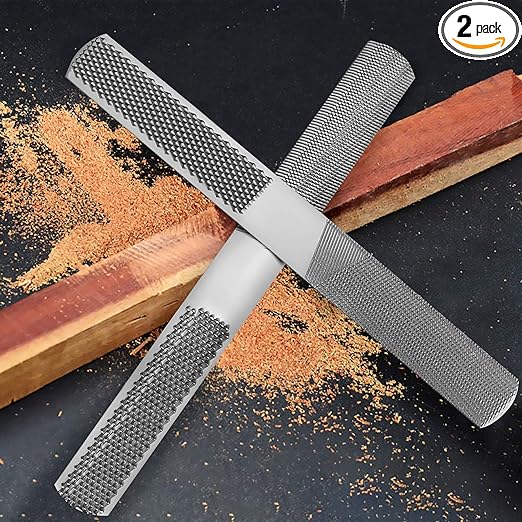 Files and rasps are hand tools used for shaping, smoothing, and finishing a wide range of materials, including wood, metal, plastic, and even ceramics. They consist of a textured surface, either with teeth (files) or small, individual cutting points (rasps), that remove material through abrasion. Here’s a comprehensive look at files and rasps:
Components of a File:
Blade (File): The blade, or file, is the flat, elongated part of the tool with a pattern of parallel, uniformly spaced teeth or ridges. Files are typically made of hardened steel and vary in length and shape, depending on their intended use.
Handle: Many files come with a handle, which provides a grip for the user to hold and control the tool. The handle may be made of wood, plastic, or metal.
Types of Files:
Single-Cut File: These files have one set of parallel teeth that extend diagonally across the file’s surface. They are ideal for removing material quickly and producing a relatively smooth finish.
Double-Cut File: Double-cut files have two sets of teeth, crisscrossing each other. This type of file is more aggressive than single-cut files and is often used for heavy material removal.
Rasp-Cut File: Rasp-cut files have individual, sharp cutting points rather than continuous teeth. They are highly effective for shaping and removing material, especially in woodwork.
Needle File: Needle files are small, precision files with fine teeth. They are ideal for intricate work in metalworking, jewelry making, and watchmaking.
Half-Round File: Half-round files have one flat side and one curved side. They are versatile and used for a variety of tasks, including shaping curved surfaces and smoothing concave or convex areas.
Round File: Round files are circular in cross-section and are used for enlarging round holes or shaping round objects.
How to Use a File:
Secure the Workpiece: Place the material you want to file securely in a vise or clamp to prevent movement during the filing process.
Select the Right File: Choose the appropriate file based on your project and the type of material you are working with. Consider the desired finish and the amount of material you need to remove.
Hold the File: Grasp the file’s handle with one hand and place the file’s blade on the material to be filed.
File in One Direction: Always file in one direction, typically away from your body. Push the file forward in smooth, controlled strokes while maintaining even pressure.
Lift the File: After each stroke, lift the file off the material slightly before reversing the direction. This prevents unnecessary wear on the file’s teeth and produces a smoother finish.
Check Progress: Frequently inspect the material to ensure you are achieving the desired shape or finish. File gradually and avoid removing too much material at once.
Rasps
Rasps are similar to files but have a distinct surface texture. Instead of continuous teeth, rasps have individual, sharp cutting points or ridges that resemble tiny chisels. This makes rasps highly effective for aggressive material removal and shaping, especially in woodworking.
Types of Rasps:
Wood Rasps: Wood rasps are designed specifically for woodworking tasks. They come in various shapes, such as flat, round, half-round, and cabinet rasps, each tailored to different tasks like shaping, smoothing, or carving wood.
Metal Rasps: Metal rasps are used for working with metal materials. They are typically made of high-carbon steel and are suitable for shaping and smoothing metal surfaces.
Cabinet Rasps: Cabinet rasps are finer and have a finer tooth pattern than regular rasps. They are ideal for detailed woodworking and finishing work.
19. Wooden ruler
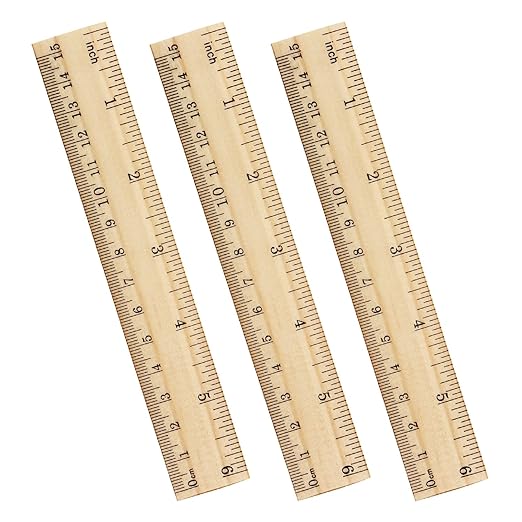 A wooden ruler is a simple and commonly used measuring tool made from wood, typically featuring markings in both imperial (inches) and metric (centimeters) units. It is a straight, flat, and slender instrument that serves the primary purpose of measuring and drawing straight lines. Here’s a comprehensive look at the wooden ruler:
Components of a Wooden Ruler:
Material: Wooden rulers are traditionally made from wood, often hardwoods like maple, birch, or beech. These materials provide durability and stability.
Length: Wooden rulers come in various lengths, with the most common being 12 inches (30 centimeters). Longer versions, such as 18 inches or 24 inches, are also available for larger-scale measurements.
Thickness: Wooden rulers are relatively thin to ensure easy handling and accurate measurements. The thickness typically ranges from about 1/16 inch (1.6 millimeters) to 1/8 inch (3.2 millimeters).
Markings: Wooden rulers have clear and precise markings along their length. These markings are etched or printed onto the ruler’s surface and provide measurement references in both inches and centimeters.
Types of Wooden Rulers:
Standard Wooden Ruler: These rulers are the most common and are suitable for general measuring and drawing tasks. They typically have measurements on one or both sides, with one side usually featuring inches and the other centimeters.
Folding Wooden Ruler: Some wooden rulers can be folded or hinged, allowing for compact storage while maintaining a longer measurement range when needed.
Architect’s Scale Ruler: Architect’s rulers are specialized wooden rulers designed for architectural and engineering drawings. They have a specific scale that facilitates precise measurement and scaling of blueprints and floor plans.
How to Use a Wooden Ruler:
Using a wooden ruler is straightforward and requires minimal instruction:
Place the Ruler: Position the ruler along the edge of the object or surface you want to measure or draw on. Ensure that the ruler is flush against the starting point of the measurement.
Read the Measurement: Locate the starting point of your measurement on the ruler and read the measurement value where the endpoint falls. Wooden rulers typically have markings divided into inches or centimeters, along with smaller subdivisions for more precise measurements.
Draw a Straight Line: To draw a straight line, hold the ruler firmly in place with one hand and use a pencil or pen with the other to draw along the edge of the ruler.
Common Uses of Wooden Rulers:
Measuring Length: Wooden rulers are primarily used for measuring the length of objects or drawing lines of specific dimensions accurately.
Drawing Straight Lines: They are essential for creating straight lines in various applications, including technical drawings, diagrams, and artwork.
Drafting and Design: In architecture, engineering, and graphic design, wooden rulers are indispensable tools for creating precise, scaled drawings.
School and Office: Wooden rulers are commonly used in classrooms and offices for tasks such as drawing graphs, charts, and diagrams.
Crafting: Craftsmen and hobbyists use wooden rulers to measure and cut materials accurately for various projects.
20. Try square
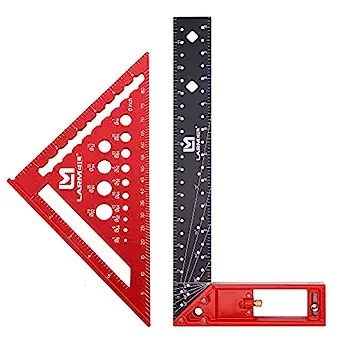 A try square is a precision hand tool commonly used in woodworking, carpentry, metalworking, and other trades to measure and mark right angles (90-degree angles) accurately. It consists of two main components: a metal blade or rule and a wooden or metal handle. Here’s a comprehensive look at the try square:
Components of a Try Square:
Blade (Rule): The blade of a try square is typically made of metal, often stainless steel or hardened steel. It is flat, straight, and has markings engraved along one edge for measuring and marking. The length of the blade can vary, with common sizes being 6 inches (150 millimeters) and 12 inches (300 millimeters).
Handle: The handle of a try square is attached to one end of the blade at a right angle. It is usually made of wood or metal, and its primary function is to provide a comfortable and secure grip for the user.
Features of a Try Square:
90-Degree Angle: The defining feature of a try square is its precision 90-degree angle between the blade and the handle. This angle is essential for checking and marking right angles accurately in various tasks.
Markings: The blade of the try square is often marked with scales and measurement graduations, which allow users to make precise measurements and mark lines at specific distances from an edge or corner.
Try Square Head: Some try squares have an additional metal piece attached to the handle, creating a “try square head.” This head may have a small hole or slot for hanging the tool when not in use.
How to Use a Try Square:
Using a try square is relatively straightforward and involves the following steps:
Position the Try Square: Place the try square against the edge or corner of the material you want to measure or mark. Ensure that the blade is in contact with the surface and that the handle is perpendicular to it.
Check for Squareness: Verify that the try square’s blade forms a perfect right angle with the material’s edge or corner. If it does, it confirms that the angle is square (90 degrees).
Make Measurements: Use the engraved markings on the blade to measure the desired distance from the edge or corner. Slide the try square along the material while keeping the blade aligned to make a precise mark.
Draw Lines: If necessary, use the try square to draw a straight, perpendicular line on the material, starting from the marked point. Hold the try square securely and use a pencil or marking tool along the edge of the blade to create the line.
Common Uses of a Try Square:
Checking Squareness: The primary purpose of a try square is to check the squareness of corners and edges to ensure they form accurate 90-degree angles. This is essential in woodworking and carpentry for constructing square joints and frames.
Marking Right Angles: Try squares are used to mark right angles on various materials, helping woodworkers and metalworkers make precise cuts and joinery.
Layout and Marking: They are indispensable tools for layout and marking tasks, such as drawing perpendicular lines, marking the center of a board, or measuring equal distances from an edge.
Quality Control: In construction and fabrication, try squares are used for quality control to verify that structures and components are built with proper squareness.
General Measuring: Try squares can also serve as general measuring tools, allowing users to check dimensions and mark precise locations on materials.
| See more woodworking tools 21 to 30 |