
50 Essential Hand Tools For Every Woodworker
Woodworking is a wonderful and rewarding hobby or profession, that allows you to create beautiful and functional pieces from wood. While power tools can be incredibly useful, hand tools remain indispensable for any woodworker. They offer precision, control, and a deeper connection to the craft.
To excel in this craft, it’s essential to have a diverse set of tools at your disposal. Whether you’re a novice or a seasoned woodworker, the right tools can make all the difference in the quality and efficiency of your work. In this article, I will explore 50 important tools for woodworkers, explaining the significance and utility of each one.
1. Circular Saw:
 A circular saw is a versatile power tool commonly used in woodworking and construction for making straight and precise cuts in various materials, with a primary focus on wood. It consists of a circular blade with sharp teeth mounted on an arbor, and the blade protrudes through the base of the saw. Here is a comprehensive explanation of the circular saw:
Components of a Circular Saw:
Blade: Circular saw blades come in various sizes and types, designed for specific cutting applications. Blades with more teeth provide cleaner cuts for finish work, while fewer teeth are better for faster rip cuts.
Motor: The motor is the heart of the circular saw, and its power rating determines the cutting capacity of the tool. Corded circular saws are powered by electricity, while cordless ones use rechargeable batteries.
Base Plate (Shoe): The base plate, also known as the shoe, is the flat metal or plastic surface that rests on the material being cut. It provides stability and helps guide the saw in a straight line.
Depth Adjustment: Circular saws typically have a depth adjustment feature that allows you to set the cutting depth by raising or lowering the blade. This is essential when making cuts of different depths.
Bevel Adjustment: Many circular saws can tilt the blade to make bevel cuts at angles other than 90 degrees. A bevel adjustment allows you to create angled cuts for things like miter joints.
Handle and Trigger: The handle provides a comfortable grip for the operator, and the trigger controls the saw’s on/off function. Some models also feature a safety switch to prevent accidental starts.
Key Features and Functions:
Straight Cuts: Circular saws excel at making straight cuts along the grain of the wood, known as rip cuts, and across the grain, called crosscuts. This makes them ideal for cutting sheet goods like plywood or OSB.
Portability: Circular saws are relatively lightweight and portable, making them suitable for both on-site construction work and in-shop projects. Cordless models offer even greater mobility.
Versatility: Besides wood, circular saws can be cut through various materials such as plastic, metal (with the appropriate blade), and even masonry (using specialized blades).
Speed and Efficiency: Circular saws are known for their speed and efficiency, allowing woodworkers and contractors to make quick work of cutting tasks.
Safety Considerations: Safety is paramount when using a circular saw. Always wear appropriate safety gear, such as safety glasses and hearing protection. Keep hands and body parts away from the blade’s path and ensure that the blade guard is functioning correctly.
Maintenance and Care:
To keep your circular saw in optimal condition, consider these maintenance tips:
Regularly clean the saw to remove sawdust and debris that can accumulate in and around the blade. Lubricate any moving parts according to the manufacturer’s recommendations.
Check the blade for sharpness and replace it when it becomes dull for safer and more efficient cutting. Inspect the power cord or battery (for cordless models) for any damage and replace it if necessary. Keep the base plate flat and clean to ensure accurate cuts.
2. Table Saw:
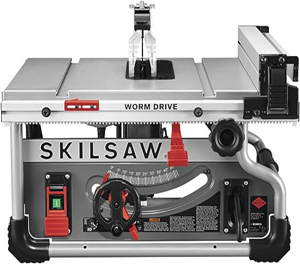 A table saw is a powerful and versatile woodworking tool that’s often considered the centerpiece of many woodworking shops. It’s designed for making precise and straight cuts in various types of wood and other materials. The table saw consists of several key components, each playing a crucial role in its operation. Here’s an in-depth explanation of the table saw:
Key Components of a Table Saw:
Tabletop (Table): The tabletop is a flat, horizontal surface that supports the material being cut. It provides stability and a reference surface for accurate cuts.
Blade: The circular saw blade, typically made of carbide-tipped steel, is mounted on an arbor beneath the tabletop. Table saw blades come in various sizes and tooth configurations, each designed for specific cutting tasks.
Fence: The fence is a parallel guide that runs along the front of the tabletop. It ensures straight and accurate cuts by guiding the workpiece parallel to the blade. The fence can be adjusted to various distances from the blade to accommodate different cutting widths.
Miter Gauge: The miter gauge is a T-shaped guide that fits into slots on the tabletop. It allows you to make precise angle cuts by pivoting the workpiece against the blade. The miter gauge can typically be adjusted to various angles for miter cuts.
Blade Height Adjustment: Most table saws have a mechanism for adjusting the height of the blade above the tabletop. This feature allows you to control the depth of your cuts, making it possible to create grooves, dadoes, and rabbets in addition to regular cuts.
Bevel Adjustment: Table saws often have a mechanism for tilting the blade to make bevel cuts. This allows you to create angled cuts, which are commonly used in joinery and decorative work.
Riving Knife or Splitter: A riving knife or splitter is a safety device mounted behind the blade. It helps prevent kickback by keeping the workpiece from pinching the blade, reducing the risk of the material being thrown back toward the operator.
Blade Guard: The blade guard is a safety feature that covers the blade during cuts, protecting the operator from accidental contact with the spinning blade. It typically moves up and down with the blade and may include anti-kickback pawls for added safety.
Functions and Capabilities:
Rip Cuts: A table saw excels at making long, straight rip cuts (cuts made along the length of the material) in various types of wood and sheet goods like plywood and MDF.
Crosscuts: By using a miter gauge or a sled, you can make precise crosscuts (cuts made across the width of the material) with a table saw.
Dadoes and Grooves: With the ability to adjust the blade height, table saws are used to create dadoes and grooves for joinery and shelf installations.
Bevel Cuts: You can tilt the blade to make bevel cuts, which are often used for creating angles, chamfers, or decorative edges.
Safety Considerations:
Safety is paramount when using a table saw due to its power and the potential risks involved. Here are some essential safety considerations:
Use the Blade Guard: Always use the blade guard and anti-kickback pawls when possible to protect yourself from accidents.
Wear Safety Gear: Use safety glasses, hearing protection, and appropriate clothing to protect yourself from dust, debris, and noise.
Keep Hands Clear: Keep your hands and body parts away from the blade’s path while cutting.
Use Push Sticks: When making narrow or small cuts, use push sticks or push blocks to maintain a safe distance from the blade.
Stay Focused: Concentrate on the task at hand and avoid distractions when operating a table saw.
3. Router:
 A router is a versatile power tool commonly used in woodworking and sometimes in other crafts like metalworking and plastic fabrication. It’s an essential tool for shaping, hollowing, grooving, and creating decorative edges in various materials, primarily wood. Routers come in both handheld and table-mounted configurations, each with its specific applications and advantages. Here’s a comprehensive explanation of the router:
Key Components of a Router:
Motor: The motor is the heart of the router, providing the power needed to spin the router bit. Routers can be powered by electricity (corded) or rechargeable batteries (cordless).
Router Base: The base is the bottom part of the router that rests on the workpiece. It provides stability and helps guide the router during operation.
Router Bit: The router bit is the cutting tool that attaches to the router’s collet (a specialized chuck). Router bits come in various shapes and sizes, each designed for specific tasks. Common router bits include straight bits, flush-trim bits, round-over bits, and dovetail bits.
Collet: The collet is a clamping mechanism that holds the router bit securely in place. It ensures that the bit remains centered and doesn’t slip during operation.
Depth Adjustment: Routers typically have a depth adjustment mechanism that allows you to control how deep the router bit cuts into the material. This is essential for achieving precise and consistent results.
Variable Speed Control: Many routers offer variable speed settings, allowing you to adjust the router’s RPM (revolutions per minute). Different materials and router bit types require varying speeds for optimal performance.
Functions and Capabilities:
Edge Profiling: Routers are commonly used to create decorative edges on wooden pieces. Round-over, chamfer, cove, and ogee are just a few of the profiles that can be achieved.
Dadoes and Grooves: Routers are perfect for cutting precise dadoes, grooves, and rabbets. This makes them valuable for joinery, shelving, and other woodworking tasks.
Mortises and Tenons: Routers can create mortises (rectangular slots) and tenons (projections) for strong and secure joinery in woodworking projects.
Inlays and Fluting: Routers can be used to create intricate inlays, decorative fluting, and intricate designs on the surface of wooden pieces.
Hollowing: Routers equipped with specialized bits can hollow out areas within a piece of wood, making them useful for crafting bowls, trays, or even signs.
Template Routing: Routers can be used with templates or jigs to duplicate complex shapes or patterns, ensuring consistent results.
Router Types:
Handheld Router: Handheld routers are portable and versatile. They are ideal for tasks that require maneuverability and can be used for both edge profiling and plunge routing.
Plunge Router: Plunge routers have a base that can be plunged or lowered into the material while the router is running. This makes them suitable for tasks like mortising and creating stopped dadoes.
Fixed-Base Router: Fixed-base routers have a stationary base, making them better suited for tasks that require precision and stability. They are commonly used in router tables.
Router Table: A router table is a stationary work surface with a mounted router underneath. Router tables are excellent for tasks that require control and precision, such as edge profiling and dado cutting. They are often used in professional woodworking shops.
Safety Considerations
Eye and Ear Protection: Always wear safety glasses and hearing protection when operating a router, as the tool generates dust and noise.
Dust Collection: Use a dust collection system to minimize airborne dust, which can be harmful to your health.
Secure Workpiece: Ensure that the workpiece is securely clamped or held in place using appropriate fixtures to prevent kickback or unintended movements.
Router Bits: Choose the right router bit for the task, and ensure it’s properly secured in the collet.
The direction of Feed: Pay attention to the direction of feed. It’s generally safer to move the router against the rotation of the bit.
4. Chisels:
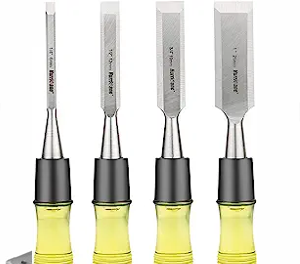 Chisels come in various shapes and sizes and are essential for carving, shaping, and fine detailing. High-quality chisels are durable and maintain a sharp edge, allowing for precise and clean cuts.
Chisels are essential hand tools with a long history of use in woodworking, metalworking, masonry, and various other crafts. They consist of a sharp, flat, or beveled metal blade attached to a handle. Chisels are primarily used for cutting, shaping, and carving materials like wood, metal, stone, and plastic. Here’s an in-depth explanation of chisels:
Key Components of a Chisel:
Blade: The blade of a chisel is the metal part that does the cutting. It can have various shapes, including flat, beveled, gouge, or skew. The edge of the blade is honed to a sharp edge, and the quality of this edge is crucial for precise and clean cuts.
Handle: The handle of a chisel provides a grip for the user and offers control during use. Chisel handles are typically made of wood, plastic, or rubber. Some chisels may have metal or wooden ferrules (collars) to secure the blade to the handle.
Types of Chisels:
Bench Chisels: These are the most common type of chisels used in woodworking. They have beveled edges and come in various widths. Bench chisels are versatile and used for a wide range of tasks, including chopping, paring, and creating joinery.
Mortise Chisels: Mortise chisels are heavier and stronger than bench chisels. They are designed specifically for cutting mortises, which are rectangular holes used in joinery.
Gouges: Gouges have a curved or U-shaped blade. They are used for carving and shaping wood, particularly when creating rounded or concave surfaces.
Skew Chisels: Skew chisels have a beveled edge at a slight angle to the sides of the blade. They are often used for making precise cuts in corners and for creating angled surfaces.
Paring Chisels: Paring chisels have thin, flat blades, and they are designed for delicate, precise work, such as removing thin layers of wood or fitting joinery.
Woodcarving Chisels: These chisels come in various specialized shapes and sizes for carving intricate designs and details in wood.
Functions and Uses:
Cutting and Shaping: Chisels are primarily used for cutting and shaping materials. Woodworkers use them to trim excess material, carve intricate designs, and shape joinery, among other tasks.
Joinery: Chisels are essential for creating precise joinery, such as dovetails, mortises, and tenons. They allow woodworkers to achieve snug-fitting joints for strong and durable connections.
Carving: Woodcarvers use gouges, V-tools, and other specialized chisels to carve intricate designs and sculptures from wood.
Masonry: In masonry, chisels are used to cut and shape bricks, stones, and concrete for construction and sculptural purposes.
Metalwork: Chisels are employed in metalworking to cut, shape, and remove material from metal surfaces.
Maintenance and Care:
Proper care and maintenance of chisels are essential for maintaining their performance and longevity:
Sharpening: Regularly sharpen the blade to maintain a sharp cutting edge. Honing guides and sharpening stones are commonly used for this purpose.
Cleaning: After use, clean chisels to remove any residue or wood shavings. Keep the blade dry to prevent rusting.
Storage: Store chisels in a dedicated chisel roll or rack to protect the blades and prevent damage to the cutting edges.
Safety: When using chisels, always wear appropriate safety gear, including safety glasses to protect your eyes from flying debris and gloves for a secure grip.
5. Hand Plane:
 Hand planes are essential tools in woodworking, dating back centuries. They are used for shaping, smoothing, and leveling wooden surfaces. Hand planes consist of a metal or wooden body with a sharp blade (iron) that protrudes through the sole. Here’s a comprehensive explanation of hand planes:
Key Components of a Hand Plane:
Body: The body of a hand plane is typically made of cast iron, steel, or wood. It serves as the base for the other components and provides stability during use.
Blade (Iron): The blade, often referred to as the iron, is the cutting part of the hand plane. It is typically made of high-carbon steel and must be extremely sharp to create smooth cuts. The blade can be adjusted for depth and lateral alignment within the plane’s body.
Frog: The frog is a metal component within the plane’s body that holds the blade at a specific angle relative to the sole. Adjusting the frog angle allows for fine-tuning the plane’s performance.
Lever Cap: The lever cap secures the blade in place and exerts pressure on it to prevent chatter (vibrations) during planning. It can be loosened to adjust the blade’s depth.
Tote (Handle): The tote is the handle on the top of the plane, providing a comfortable grip for the user. Some hand planes, like block planes, may have a front knob instead of a tote.
Knob (Front Knob): The knob is a smaller handle located at the front of the plane. It provides an additional grip point for better control during use.
Types of Hand Planes:
Block Plane: Block planes are compact and versatile. They are primarily used for trimming, chamfering edges, and smoothing small surfaces. They fit comfortably in one hand and are often used for on-the-spot adjustments.
Smoothing Plane: Smoothing planes are used for final surface preparation. They have a relatively short sole and a finely set blade, making them ideal for creating glass-smooth finishes on wood surfaces.
Jack Plane: Jack planes are versatile and can perform both rough and fine work. They are often used for preliminary rough shaping and initial smoothing.
Jointer Plane: Jointer planes have long soles that make them ideal for flattening and truing the edges of boards for joinery work. They are commonly used for creating straight, square edges for glue-ups.
Try Plane (Jointer/Fore Plane): Try planes are similar to jointer planes but slightly shorter. They are used for testing and truing surfaces during the final preparation of a project.
Fore Plane: Fore planes, or fore/jointer planes, are versatile planes used for preliminary work on rough lumber, leveling surfaces, and performing general smoothing tasks.
Functions and Uses
Flattening: Hand planes are used to flatten and level wooden surfaces, ensuring they are smooth and free from imperfections.
Squaring Edges: They can be used to square the edges of boards for joinery, ensuring a snug fit for joints like dovetails and mortise-and-tenon.
Smoothing: Hand planes create a smooth and polished finish on wood surfaces, eliminating tool marks and tear-out left by other cutting tools.
Beveling and Chamfering: They are used to bevel or chamfer edges for decorative or functional purposes.
Trimming: Block planes are especially useful for trimming protruding edges or end grain.
Maintenance and Care:
To keep hand planes in good working condition, follow these maintenance tips:
Sharpen the Blade: Regularly sharpen the blade to maintain a keen edge. Sharpening stones or honing guides can be used for this purpose.
Lubricate and Protect: Apply a light coating of oil or wax to the metal components to prevent rust and ensure smooth movement.
Clean and Adjust: Keep the plane clean and free from debris. Regularly check and adjust the blade for depth and lateral alignment to ensure accurate planning.
Store Properly: Store hand planes in a dry place to prevent rusting, and keep the blade retracted to protect it from damage.
6. Jigsaw:
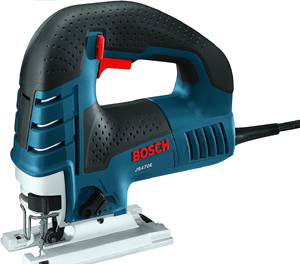 A jigsaw is a versatile power tool commonly used in woodworking, metalworking, and construction. It’s designed for making curved cuts, straight cuts, and intricate shapes in various materials, primarily wood, metal, plastic, and sometimes ceramic tile. The jigsaw gets its name from the characteristic up-and-down or orbital motion of its blade, which resembles the movement of a jigsaw puzzle piece. Here’s an in-depth explanation of the jigsaw:
Key Components of a Jigsaw:
Body: The body of a jigsaw is typically made of plastic or metal and houses the internal components, including the motor and the mechanisms for blade movement.
Handle: The handle is the part of the jigsaw that you grip while operating the tool. It provides control and stability during use.
Trigger: The trigger is the switch that controls the jigsaw’s power. Squeezing the trigger activates the motor and starts the cutting action.
Blade Clamp: The blade clamp secures the jigsaw blade in place. Most jigsaws use a quick-release mechanism for easy blade changes.
Shoe/Base Plate: The shoe or base plate is the flat, metal, or plastic surface that rests on the material being cut. It provides stability and helps guide the jigsaw during the cut.
Blade Guide or Roller: Some jigsaws have a blade guide or roller that helps keep the blade aligned and reduces lateral movement during cuts.
Types of Jigsaw Blades:
Jigsaw blades come in various types, each designed for specific materials and cutting tasks. Some common blade types include:
Woodcutting Blades: These blades are designed for cutting wood and are available in various tooth configurations for rough or fine cuts.
Metal cutting Blades: Metal-cutting blades have smaller, finer teeth and are suitable for cutting metal, aluminum, and non-ferrous materials.
Plastic-cutting Blades: These blades have sharp teeth designed to cut plastic and PVC materials cleanly.
Bi-Metal Blades: Bi-metal blades combine two types of metal to cut through both wood and metal, making them versatile for various applications.
Specialty Blades: There are specialized blades for cutting materials like ceramic tile, fiberboard, and laminates.
Functions and Uses:
Curved Cuts: Jigsaws excel at making curved cuts, whether they are gentle arcs or intricate designs. This capability makes them essential for cutting out shapes and patterns in woodworking and other crafts.
Straight Cuts: Jigsaws can also make straight cuts, although they may not be as precise as those made with other saws like circular saws or straightedge guides.
Plunge Cuts: Jigsaws can start cuts in the middle of a material without an initial hole, making them useful for creating interior cutouts, such as sink openings in countertops.
Bevel Cuts: Some jigsaws have adjustable bases that allow for bevel cuts at various angles, making them versatile for beveling edges or creating angled joints.
Trimming and Fitting: Jigsaws are excellent for trimming and fitting work, such as fitting laminate flooring around obstacles or making adjustments to cabinet components.
Scrollwork and Detailing: Woodworkers use jigsaws to create intricate scrollwork, decorative patterns, and detailed designs on wooden surfaces.
Safety Considerations:
Safety is crucial when using a jigsaw. Here are some safety considerations:
Eye and Ear Protection: Wear safety glasses or a face shield to protect your eyes from debris and hearing protection to reduce noise exposure.
Firm Grip: Maintain a firm grip on the tool, and keep both hands on the handle while cutting.
Secure Workpiece: Secure the material being cut to prevent it from moving during the cutting process.
Blade Selection: Choose the appropriate blade for the material you’re cutting.
Follow Cut Lines: Stay on the cut lines to ensure accurate results and prevent kickbacks.
Cutting Speed: Adjust the speed of the jigsaw to match the material being cut. Slower speeds are often better for more precise cuts.
7. Miter Saw:
 A miter saw, also known as a chop saw or drop saw, is a specialized power tool used in woodworking, carpentry, and construction for making precise crosscuts and miter cuts in various materials, primarily wood, but also plastic, metal, and other materials. Miter saws are particularly valuable for creating accurate angles and making repetitive cuts. Here’s a comprehensive explanation of the miter saw:
Key Components of a Miter Saw:
Blade: The blade is the cutting component of the miter saw. It can come in various sizes and with different tooth configurations, depending on the intended cutting applications. Common blade sizes range from 8 inches to 12 inches.
Blade Guard: The blade guard is a safety feature that covers the blade when it’s not in use and automatically retracts when you lower the saw to cut. It helps prevent accidental contact with the spinning blade.
Miter Gauge: The miter gauge is a guide that allows you to set and adjust the angle at which you want to make a crosscut. Most miter saws can cut angles from 0 to 45 degrees or more on either side.
Miter Scale: The miter scale is a reference scale on the saw that helps you set the desired cutting angle precisely.
Bevel Adjustment: Many miter saws have a bevel adjustment that tilts the blade to make bevel cuts. This allows you to create angled cuts along both the horizontal and vertical planes.
Fence: The fence is a vertical guide that holds the workpiece securely against the saw’s base, ensuring a stable and accurate cut. It can be adjusted for height and removed when making compound miter cuts.
Types of Miter Saws:
Basic Miter Saw: A basic miter saw is designed for making straight crosscuts and miter cuts. It typically doesn’t have beveling capabilities.
Compound Miter Saw: A compound miter saw can make both miter and bevel cuts, allowing you to create compound angles. There are single and dual bevel compound miter saws.
Sliding Compound Miter Saw: Sliding compound miter saws have an additional sliding mechanism that allows the blade to move forward and backward, increasing the saw’s capacity to cut wider boards.
Functions and Uses:
Crosscuts: The primary function of a miter saw is to make precise crosscuts, which are cuts made perpendicular to the grain of the wood. This is especially useful for cutting boards to length accurately.
Miter Cuts: Miter saws are excellent for creating miter cuts, which are angled cuts across the width of a workpiece. These are commonly used for creating corners, frames, and angled joints.
Bevel Cuts: If the miter saw has beveling capabilities, it can make bevel cuts, which are angled cuts along the thickness of the workpiece. This is useful for creating beveled edges and compound angles.
Compound Cuts: Compound miter saws can make both miter and bevel cuts simultaneously, which is crucial for complex projects like crown molding and trim work.
Safety Considerations:
Eye and Ear Protection: Always wear safety glasses or goggles to protect your eyes from flying debris and hearing protection to reduce noise exposure.
Secure Workpiece: Ensure that the workpiece is firmly secured against the fence and the base of the saw to prevent movement during the cut.
Use Blade Guard: Keep the blade guard in place, and make sure it retracts smoothly when cutting.
Keep Hands Clear: Keep your hands and body parts away from the blade’s path while cutting.
Familiarize with Controls: Understand the controls and safety features of your specific miter saw model by reading the user manual.
8. Drill Press:
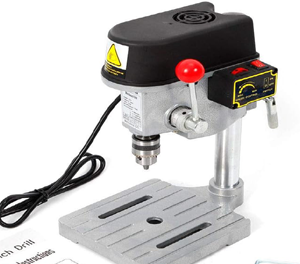 A drill press, also known as a bench drill, pedestal drill, or pillar drill, is a stationary machine tool used for accurately drilling holes in various materials. It offers precision, consistency, and control that hand-held drills cannot match. Drill presses are commonly found in woodworking shops, metalworking shops, and manufacturing facilities. Here’s a comprehensive explanation of the drill press:
Key Components of a Drill Press:
Base: The base of the drill press provides stability and support for the entire machine. It is typically a heavy, flat platform that rests on the floor or a workbench.
Column (Pillar): The column is a vertical, cylindrical structure that connects the base to the head of the drill press. It provides rigidity and support for the drilling assembly.
Head: The head houses the motor, spindle, and other critical components. It is mounted on the column and can be raised or lowered to adjust the drilling depth.
Table: The table is a flat, adjustable surface located beneath the spindle. It provides a stable platform for the workpiece and can be moved up, down, and tilted at various angles to accommodate different drilling requirements.
Spindle: The spindle is the rotating shaft that holds the drill bit. It is driven by the motor and can be adjusted for depth using a lever or handle.
Chuck: The chuck is a device located at the end of the spindle that holds the drill bit securely. Drill presses typically have keyless chucks that allow for easy and quick bit changes.
Depth Stop: The depth stop is a mechanism that helps set the drilling depth precisely. It prevents the spindle from traveling beyond a specified point, ensuring consistent hole depths.
Speed Control: Drill presses often feature a speed control mechanism that allows you to adjust the rotation speed of the spindle to match the material being drilled and the size of the drill bit.
Types of Drill Presses:
Benchtop Drill Press: These compact drill presses are designed to sit on a workbench or table. They are suitable for small to medium-sized projects and are more portable than floor-standing models.
Floor-standing Drill Press: Floor-standing drill presses are larger and heavier machines that are bolted to the floor for stability. They are suitable for heavy-duty tasks and large workpieces.
Radial Drill Press: Radial drill presses have an adjustable arm that can pivot and move horizontally, providing versatility in positioning the workpiece and drill bit.
Functions and Uses:
Drilling Holes: The primary function of a drill press is to accurately drill holes in various materials, including wood, metal, plastic, and more.
Counterboring and Countersinking: Drill presses can be used to create counterbored or countersunk holes, which are often used to recess screw heads or bolts.
Reaming: Reaming involves enlarging an existing hole with a precise fit. Drill presses can perform reaming operations using reamers.
Tapping: Some drill presses can be equipped with tapping attachments to thread holes for screws, bolts, or studs.
Milling and Slotting: With appropriate attachments and tooling, a drill press can perform light milling and slotting operations.
Safety Considerations:
Eye Protection: Always wear safety glasses or goggles to protect your eyes from flying chips and debris.
Clamp Workpiece: Securely clamp the workpiece to the table to prevent it from spinning or moving during drilling.
Adjust Speed: Set the appropriate drilling speed for the material and bit size being used.
Use Proper Technique: Maintain a firm grip on the workpiece and apply steady, even pressure while drilling.
Keep Hands Clear: Keep your hands and clothing away from the drill bit and rotating parts.
Use a Pilot Hole: When drilling into hard materials like metal, it’s often helpful to start with a pilot hole to guide the larger drill bit.
9. Clamps:
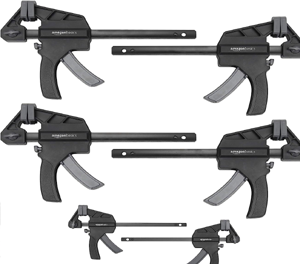 Clamps are versatile tools used in woodworking, metalworking, construction, and various other crafts and trades. They serve the primary function of holding two or more workpieces together, providing stability, alignment, and pressure during gluing, fastening, welding, or other processes. Clamps come in a variety of types, each designed for specific tasks and applications. Here’s an in-depth explanation of clamps:
Key Components of a Clamp:
Jaws: The jaws are the part of the clamp that comes into direct contact with the workpieces. They are typically padded or covered with non-marring materials like rubber, plastic, or cork to prevent damage to the workpiece.
Screw or Threaded Rod: Clamps use a threaded rod or screw mechanism to apply pressure to the jaws. Turning the screw tightens the clamp, bringing the jaws closer together and securing the workpieces.
Handle: The handle is the part of the clamp that you grasp to operate it. Some clamps have a ratcheting handle for easier tightening and quick-release mechanisms for rapid adjustments.
Frame or Bar: The frame or bar of the clamp provides the structure and stability for the jaws and the screw mechanism. It can be made of various materials, including steel, aluminum, or composite materials.
Types of Clamps:
Bar Clamps: Bar clamps, also known as F-clamps or sliding clamps, consist of a long bar with adjustable jaws. They are suitable for a wide range of clamping tasks and offer excellent stability.
C-Clamps: C-clamps have a C-shaped frame with a screw mechanism. They are often used for securing metalwork and are available in various sizes.
Pipe Clamps: Pipe clamps use a section of pipe as the frame and have a screw mechanism for tightening. They are commonly used in woodworking for large glue-up projects.
Spring Clamps: Spring clamps have jaws that are held together by a spring, making them easy to open and close with one hand. They are ideal for light-duty clamping tasks.
Quick-Release Clamps: Quick-release clamps, such as trigger clamps and one-handed bar clamps, feature a mechanism that allows for rapid clamping and releasing with one hand.
Toggle Clamps: Toggle clamps are designed for specific applications, often used in fixtures and jigs to hold workpieces in place during machining or welding.
Pneumatic Clamps: Pneumatic clamps use compressed air to provide clamping force. They are often used in industrial settings for automation and production processes.
Woodworking Clamps: There are various clamps specifically designed for woodworking, including parallel clamps, pipe clamps, edge clamps, and cabinet clamps, among others.
Functions and Uses:
Holding Workpieces for Gluing: Clamps are commonly used in woodworking and carpentry to hold pieces together while the glue dries, ensuring a strong and precise bond.
Securing Parts for Welding: In metalworking, clamps are used to hold metal pieces together during welding, ensuring proper alignment.
Clamping During Assembly: Clamps are used to hold parts in place during assembly processes, such as joining furniture components or building cabinets.
Creating Jigs and Fixtures: Clamps are essential for securing workpieces in jigs and fixtures used in machining, routing, and other manufacturing processes.
Holding Material for Cutting: When cutting materials like pipes or tubing, clamps can secure the workpiece, ensuring clean and accurate cuts.
Applying Pressure for Gluing or Clamping: In construction and cabinetry, clamps are used to apply pressure during the installation of materials like countertops, laminates, or moldings.
Safety Considerations:
Proper Clamping Pressure: Apply the right amount of pressure to avoid over-clamping, which can damage the workpiece, or under-clamping, which may result in a weak bond.
Protect Workpieces: Use protective pads or blocks between the clamp jaws and the workpiece to prevent marring or denting.
Securely Fasten Clamps: Ensure that clamps are securely tightened and that the workpieces are firmly held in place.
Inspect for Wear: Regularly inspect clamps for signs of wear, damage, or fatigue, and replace or repair them as needed.
Use Clamps Safely: Be cautious when using large or heavy clamps, as they can pose a risk of injury if mishandled or dropped.
10. Sanding Tools:
 Sanding tools are essential equipment used to smooth and finish surfaces by abrasion. They remove imperfections, roughness, or old finishes from various materials, primarily wood, but also metal, plastic, and even painted surfaces. Sanding tools come in a variety of types, each designed for specific tasks and applications. Here’s a comprehensive explanation of sanding tools:
Types of Sanding Tools:
Sandpaper: Sandpaper is one of the simplest and most widely used sanding tools. It consists of abrasive particles adhered to a paper or cloth backing. Sandpaper comes in various grits, with lower grits being coarser and higher grits finer. Coarse grits are used for heavy material removal, while finer grits are used for finishing and smoothing.
Sanding Blocks: Sanding blocks are handheld tools that hold a sheet of sandpaper in place, providing a flat and even surface for sanding. They come in various shapes, including rectangular and contoured blocks, to accommodate different surfaces and tasks.
Random Orbital Sander: Random orbital sanders use a circular sanding pad that moves in an elliptical or random pattern. This motion minimizes swirl marks and creates a smooth finish. They are versatile and suitable for various materials and applications.
Palm Sander: Palm sanders are compact, hand-held sanding machines with rectangular sanding pads. They are ideal for smaller projects and precise work. They usually vibrate in a straight-line motion.
Belt Sander: Belt sanders have a continuous sanding belt that moves over two rollers. They are designed for heavy material removal and rapid surface leveling. They are often used on large, flat surfaces.
Spindle Sander: Spindle sanders have a rotating spindle with a sanding sleeve. They are used for sanding curved or contoured surfaces and are common in woodworking for tasks like shaping chair legs.
Detail Sander: Detail sanders, also known as mouse sanders, have a small triangular pad for accessing tight corners and small spaces. They are suitable for intricate work.
Disc Sander: Disc sanders have a circular sanding disc mounted on a rotating spindle. They are commonly used in metalworking for smoothing and shaping metal surfaces.
Drum Sander: Drum sanders have a sanding drum that rotates on a horizontal axis. They are often used for heavy-duty sanding tasks like floor sanding.
Functions and Uses:
Material Removal: Sanding tools are used to remove rough surfaces, paint, varnish, old finishes, and imperfections from materials, leaving a smooth and even surface.
Surface Preparation: They prepare surfaces for painting, staining, or finishing by creating a clean and uniform base.
Smoothing: Sanding tools are crucial for achieving a smooth and polished finish on woodworking projects, furniture, and cabinetry.
Deburring: In metalworking, sanding is used to remove burrs and sharp edges from metal components.
Curved Surface Sanding: Sanding tools like spindle sanders and detail sanders are used for smoothing and shaping curved or contoured surfaces.
Floor Sanding: Drum sanders and orbital floor sanders are used to refinish and restore wooden floors by removing old finishes and smoothing the wood surface.
Safety Considerations:
Eye and Respiratory Protection: Always wear safety glasses or goggles to protect your eyes from flying dust particles. When sanding materials that produce fine dust, use a dust mask or respirator to protect your respiratory system.
Ventilation: Ensure proper ventilation in your workspace to reduce the buildup of dust and fumes.
Ear Protection: Use hearing protection when operating loud sanding tools, such as belt sanders.
Proper Technique: Follow the correct sanding technique, applying even pressure and moving the tool or sandpaper in the direction of the grain or pattern.
Work Area Cleanup: Regularly clean your work area to remove dust and debris, reducing the risk of slipping and tripping.
Inspect Sandpaper: Check sandpaper for wear and tear, and replace it when it becomes worn to ensure effective sanding.
| See more woodworking tools 11 to 20 |
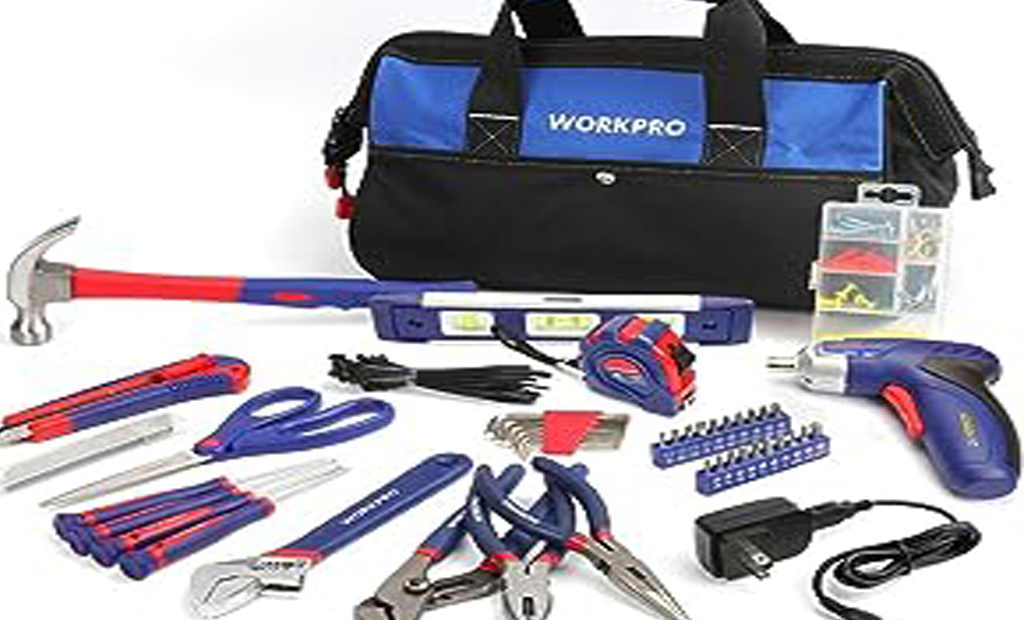
In addition to these 10 essential tools, woodworkers often require a variety of measuring and marking tools, safety equipment such as goggles and dust masks, and a well-organized workspace. It’s also crucial to invest in quality tools to ensure longevity and precision in your woodworking endeavors.
As you advance in your woodworking journey, you’ll discover that the tools you choose can greatly impact the quality and efficiency of your work. Therefore, it’s wise to invest in the best tools you can afford, maintain them properly, and continue to hone your skills to create beautiful and functional pieces of woodwork. Whether you’re crafting furniture, cabinets, or small decorative items, these 10 essential tools will serve as the foundation of your woodworking arsenal.
These 50 hand tools are the backbone of any woodworker’s toolkit, whether you’re a beginner or a seasoned pro. They provide the precision and control needed to craft beautiful, functional pieces from wood. As you gain experience, you’ll discover how each tool contributes to the art of woodworking, allowing you to bring your creative visions to life. So, stock up your workshop, hone your skills, and embark on woodworking projects with confidence.


2 comments on “50 Essential Hand Tools Every Woodworker Should Have”