
| Return to woodworking tools 11 to 20 |
21. Combination Square
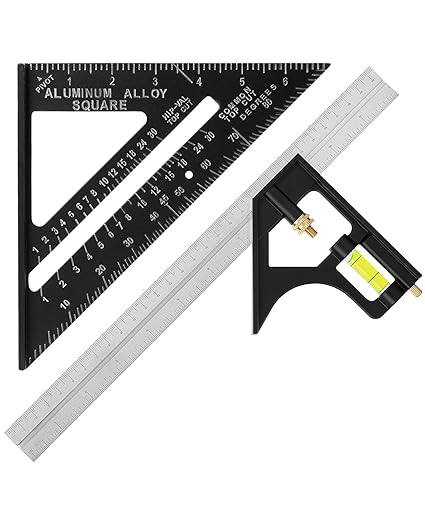 A combination square is a versatile measuring and layout tool commonly used in woodworking, metalworking, and construction. It consists of a ruler-like blade and a head that can be adjusted to various angles and positions, allowing it to perform a wide range of tasks accurately. Here’s a comprehensive look at the combination square:
Components of a Combination Square:
Blade (Ruler): The blade is typically made of stainless steel or hardened steel and comes in various lengths, with common sizes being 12 inches (300 millimeters) and 6 inches (150 millimeters). The blade has measurements and graduations engraved along one or both edges.
Head: The head of a combination square is a removable piece that attaches to one end of the blade. It consists of several key parts:
- Square Base: The square base forms a 90-degree angle with the blade when tightened in position.
- Protractor: A protractor scale allows the head to be rotated and locked at different angles, typically from 0 to 180 degrees.
- Level Vial: Some combination squares have a built-in level vial within the head, enabling users to ensure that a surface is level or plumb.
Locking Mechanism: The combination square features a locking mechanism on the head that securely holds it in place along the blade at the desired angle or position.
Features of a Combination Square:
Versatility: One of the key features of a combination square is its versatility. It can function as a square (90-degree angle), a protractor (to measure and set angles), and a depth gauge (for measuring depths and distances from edges).
Markings: The blade typically has measurement markings in both imperial (inches) and metric (centimeters) units, making it suitable for various measurement systems.
Adjustability: The head can be adjusted along the length of the blade to measure or mark specific distances from edges or surfaces accurately.
Leveling Capability: Some combination squares are equipped with a level vial, making it useful for leveling and plumbing tasks in addition to measuring and marking.
How to Use a Combination Square:
Using a combination square involves a few basic steps:
Choose the Mode: Determine the specific task you want to perform—whether it’s measuring, marking square lines, setting angles, or checking levels.
Adjust the Head: Loosen the locking mechanism on the head, allowing you to slide it along the blade to the desired position or angle.
Lock the Head: Once you’ve positioned the head where you need it, securely lock it in place by tightening the locking mechanism.
Measure or Mark: Use the combination square to measure distances, transfer measurements from one location to another, draw square lines, or set angles as required for your project.
Common Uses of a Combination Square:
Checking Squareness: A combination square is used to check the squareness of corners and edges, ensuring that they form precise 90-degree angles in woodworking, metalworking, and construction.
Measuring Lengths: It can be used as a ruler to measure lengths accurately, especially for marking or cutting materials to specific sizes.
Layout and Marking: Combination squares excel at layout and marking tasks, such as drawing perpendicular lines, marking angles, and transferring measurements from one part of a project to another.
Setting Angles: The protractor feature allows for setting and measuring angles with precision, essential for tasks like miter cuts, bevel cuts, and layout work.
Depth Measurement: By extending the blade beyond the head and locking it, the combination square can be used as a depth gauge to measure the depth of holes, grooves, or recesses.
Leveling and Plumbing: When equipped with a level vial, the combination square helps determine whether a surface is level or plumb, making it valuable for various construction and installation tasks.
22. Marking Gauge
 A marking gauge is a simple but essential hand tool used in woodworking and carpentry for marking precise lines, depths, and dimensions on wood or other materials. It consists of a beam or rod with a sharp marking point at one end and an adjustable fence or head at the other end. Here’s a comprehensive look at the marking gauge:
Components of a Marking Gauge:
Beam (Rod): The beam is typically made of wood, metal, or plastic and serves as the main body of the marking gauge. It is usually straight and slender, with a flat side that rests against the wood surface.
Marking Point: At one end of the beam, there is a sharp marking point, often made of steel, that is used to score the wood’s surface. The point can be adjusted in and out of the beam to control the depth of the mark.
Fence (Head): The fence or head is attached to the opposite end of the beam at a right angle. It can be moved along the length of the beam and locked in place at the desired distance from the marking point. The fence is crucial for setting the distance from the edge of the wood to the point where the mark will be made.
Features of a Marking Gauge:
Adjustability: The marking gauge is highly adjustable, allowing woodworkers to set precise measurements for marking and scoring the wood surface.
Locking Mechanism: To maintain the set measurement, marking gauges are equipped with a locking mechanism, which secures the fence in place along the beam.
Multiple Uses: Marking gauges are versatile tools used for various tasks, such as marking mortise and tenon joints, scribing lines for cutting or shaping, and setting depths for woodworking operations like dadoes and rabbets.
How to Use a Marking Gauge:
Set the Desired Measurement: Loosen the locking mechanism on the marking gauge’s fence and slide it along the beam to the desired distance from the marking point. This distance determines where the mark will be made on the wood.
Lock the Fence: Once you’ve set the measurement, securely lock the fence in place by tightening the locking mechanism. This ensures that the distance remains constant while marking.
Position the Gauge: Place the marking gauge on the flat side of the beam against the wood surface, ensuring that the fence is in contact with the edge of the material.
Mark the Wood: Apply downward pressure on the marking gauge while pulling it along the surface of the wood. The sharp marking point will score the wood, leaving a precise and consistent mark.
Common Uses of a Marking Gauge:
Mortise and Tenon Joints: Marking gauges are frequently used to scribe lines and set depths when marking out the mortises and tenons for joinery in woodworking.
Dado and Rabbet Cuts: They are essential for setting the depth and location of dadoes, rabbets, and other types of grooves or recesses in woodworking.
Layout Work: Marking gauges are useful for laying out precise lines and dimensions on wood, especially when transferring measurements from one part of a project to another.
Scoring for Saw Cuts: They can be used to score the wood surface, create a guide for saw cuts, and ensure straight and accurate cuts.
Scribing Lines: Marking gauges are handy for scribing lines for custom fits and trims, such as fitting cabinet components or moldings.
23. Sliding Bevel Gauge
 A sliding bevel gauge, often referred to simply as a bevel gauge, is a hand tool used primarily in woodworking and carpentry for measuring, transferring, and setting angles accurately. It consists of a beam or blade with a movable stock or head attached to one end. The tool allows users to precisely measure and replicate angles for various woodworking tasks. Here’s a comprehensive look at the sliding bevel gauge:
Components of a Sliding Bevel Gauge:
Beam (Blade): The beam, also known as the blade, is typically made of metal or wood and serves as the main body of the bevel gauge. It is usually flat and elongated, with measurement markings along one edge.
Stock (Head): The stock, or head, is attached to one end of the beam at a pivot point. It can be rotated and locked in place at different angles, allowing users to set and measure various angles.
Locking Mechanism: To maintain the set angle securely, sliding bevel gauges are equipped with a locking mechanism, typically a thumbscrew or lever, which tightens to hold the stock firmly in place.
Features of a Sliding Bevel Gauge:
Angle Measurement: The primary function of a sliding bevel gauge is to measure and replicate angles. Users can set the gauge to a specific angle and then transfer or mark that angle onto another piece of wood or material.
Adjustability: Sliding bevel gauges are highly adjustable, allowing for precise angle settings. They can be used to measure and replicate acute and obtuse angles as well as right angles (90 degrees).
Lockable Angle: Once the desired angle is set, the locking mechanism secures the stock in place, ensuring that the angle remains constant while measuring or marking.
How to Use a Sliding Bevel Gauge:
Set the Desired Angle: Loosen the locking mechanism on the sliding bevel gauge’s stock. Rotate the stock to the desired angle, aligning it with the angle you want to measure or transfer.
Lock the Angle: Once you’ve set the angle, securely lock the stock in place by tightening the locking mechanism. Ensure that the stock is firmly held at the chosen angle.
Transfer or Mark the Angle: Position the sliding bevel gauge on the surface or edge of the material where you want to measure or mark the angle. The stock will rest against the reference surface, aligning with the chosen angle. Use the beam to extend the angle or transfer it onto the material by drawing a line or making a mark.
Check the Angle: Before making any cuts or adjustments, double-check the angle to ensure accuracy, especially for critical joinery or cuts.
Common Uses of a Sliding Bevel Gauge:
Joinery: Sliding bevel gauges are frequently used in woodworking joinery to set and replicate angles for cutting and fitting joints like dovetails, mortise and tenon, and miter joints.
Layout Work: They are essential tools for layout work in woodworking, allowing for the precise marking of angles and lines on workpieces.
Roof Framing: In construction and carpentry, sliding bevel gauges are used to measure and transfer angles for roof framing, especially for the creation of complex roof structures.
Staircase Construction: They play a crucial role in staircase construction, where precise angles are needed to cut stringers, treads, and risers.
Metalworking: Sliding bevel gauges are also used to measure and mark angles on metal materials.
24. Carpenter’s Pencil:
 A carpenter’s pencil is a specialized marking and layout tool used primarily in woodworking and construction. Unlike regular pencils, carpenter’s pencils are uniquely designed to withstand the rigors of the job site and provide distinct advantages for marking on rough surfaces and materials. Here’s a comprehensive look at carpenter’s pencils:
Components of a Carpenter’s Pencil:
Shape: Carpenter’s pencils are typically flat and rectangular, which sets them apart from the cylindrical shape of regular pencils. This flat shape prevents them from rolling away on uneven surfaces, making them more practical for job sites.
Lead Core: The lead core of a carpenter’s pencil is broader and flatter than that of a standard pencil. This design results in thicker, more durable lines, making them easier to see on rough or textured surfaces.
Casing: The casing of a carpenter’s pencil is usually made of wood, plastic, or composite materials. It’s designed to protect the lead core and provide a comfortable grip for the user.
Clips and Erasers: Some carpenter’s pencils may include built-in clips for attaching to pockets or tool belts, although this feature is less common. They typically do not have erasers because they are not used for fine, detailed writing or drawing.
Features of Carpenter’s Pencils:
Durable Lead: The thicker lead core in carpenter’s pencils is more durable and less likely to break or wear down when marking on hard surfaces, such as wood, concrete, or drywall.
Flat Design: The flat shape of carpenter’s pencils makes them easy to grip and prevents them from rolling away when placed on inclined or uneven surfaces. This is especially important on construction sites where pencils can easily be lost.
Visible Lines: The broader lines produced by carpenter’s pencils are highly visible, making it easier for carpenters and tradespeople to see their markings, even in low-light conditions or when working with rough materials.
Long-Lasting: Carpenter’s pencils are known for their longevity. They can last through extended periods of use and continue to produce clear markings.
How to Use a Carpenter’s Pencil:
Grip the Pencil: Hold the carpenter’s pencil securely with your hand, ensuring a comfortable grip on the flat, rectangular casing.
Mark the Surface: Position the flat side of the carpenter’s pencil against the surface where you want to make a mark. Apply firm pressure and move the pencil across the material to create a visible, thick line.
Sharpener: To maintain a sharp point, carpenter’s pencils require a specialized pencil sharpener. Sharpen the pencil as needed to ensure precise and clear markings.
Common Uses of Carpenter’s Pencils:
Carpentry: Carpenter pencils are primarily used by carpenters and woodworkers for marking measurements, cutting lines, and making notes on wooden surfaces, such as boards, beams, and framing.
Construction: In the construction industry, carpenter’s pencils are essential for marking layouts, cutting lines, and notating measurements on materials like drywall, concrete, and structural components.
Metalworking: While less common in metalworking, carpenter’s pencils can be used to mark metal surfaces, especially when precision is not critical.
Landscaping: Landscapers use carpenter’s pencils for marking and notating measurements on outdoor materials like lumber, decking, and landscaping timbers.
General DIY: Homeowners and DIY enthusiasts often use carpenter’s pencils for various projects, including woodworking, home renovations, and outdoor construction tasks.
25. Coping Stick
A coping stick, also known as a coping saw stick or coping stick tool, is a simple yet invaluable hand tool used in woodworking, specifically for coping joints. Coping is a technique used to create precise and tight-fitting joints, often seen in crown molding, baseboards, and other decorative woodwork. The coping stick aids in the process of coping by providing support and stability while cutting intricate shapes. Here’s a comprehensive look at the coping stick:
Components of a Coping Stick:
A coping stick is a basic tool with minimal components:
Handle: The handle is the part of the coping stick that you hold while using it. It is typically a cylindrical or rectangular piece made of wood, plastic, or another comfortable-to-grip material.
Flat Edge: One side of the coping stick is flat and smooth. This edge is designed to rest against the wall or surface you are working on and provides stability and support while coping joints.
Features and Characteristics:
The coping stick is a straightforward tool, but it serves a critical purpose in woodworking:
Stability: The primary function of the coping stick is to provide stability and support to the workpiece being coped. It helps ensure that the workpiece remains steady and prevents it from shifting or splintering during the coping process.
Durability: Coping sticks are typically made from durable materials that can withstand the pressure and friction of coping. They are designed to last and remain reliable through repeated use.
How to Use a Coping Stick:
Using a coping stick is an essential part of the coping joint process. Here’s how it’s used:
Prepare the Workpiece: Before coping, prepare the workpiece by making the first cut with a coping saw or a jigsaw, following the profile of the molding or piece you’re trying to match.
Position the Coping Stick: Place the flat edge of the coping stick against the wall or work surface so that it supports the workpiece at the correct angle. The flat edge should be flush against the wall.
Cope the Molding: With the coping stick in place, use a coping saw to make the second cut along the profile of the molding. The coping stick provides stability and keeps the molding steady as you make precise cuts to create a tight-fitting joint.
Fine-tune the Fit: After coping, you may need to fine-tune the joint for a snug fit. You can use sandpaper, files, or a rasp to remove any imperfections or excess material.
Test the Fit: Once you’re satisfied with the cope, test the fit by joining the two pieces of molding. The cope should fit snugly against the first piece, creating a clean and seamless joint.
Common Uses of a Coping Stick:
Coping sticks are primarily used in finish carpentry and woodworking for creating tight-fitting joints, especially in decorative moldings and trim work. Here are some common applications:
Crown Molding: Coping sticks are often used to cope with the joints in crown molding, ensuring a precise fit at the inside and outside corners.
Baseboards: They are used to cope with the joints where baseboards meet at corners or transitions.
Chair Rails: Coping sticks help create clean and seamless joints in chair rails and other decorative moldings.
Wainscoting: When wainscoting panels meet at corners or intersect with other architectural elements, coping sticks ensure that the joints are neat and well-fitted.
Custom Woodwork: In any custom woodworking project that involves intricate joints and profiles, coping sticks are valuable for achieving a professional finish.
26. Card Scraper
A card scraper, also known as a cabinet scraper or simply a scraper, is a versatile hand tool used in woodworking for removing thin shavings of wood and creating a smooth and flat surface on wooden workpieces. It’s a valuable tool for achieving fine finishes and removing imperfections from wood surfaces. Here’s a comprehensive look at the card scraper:
Components of a Card Scraper:
A card scraper is a straightforward tool with minimal components:
Blade: The blade of a card scraper is typically made of high-carbon steel or other hard and durable materials. It is rectangular and has a sharp, flat edge on one or both long sides. The edge is what makes contact with the wood and removes material.
Burr: The edge of the blade is turned and sharpened to create a tiny, hooked burr. This burr is what cuts the wood fibers when the scraper is used.
Features and Characteristics:
Card scrapers possess several unique features and characteristics that make them valuable tools in woodworking:
Versatility: Card scrapers can be used on a wide range of wood species and for various tasks. They are effective at removing tool marks, smoothing surfaces, and fine-tuning joints.
Control: When used correctly, card scrapers offer excellent control over the amount of material removed. Woodworkers can precisely adjust the pressure and angle to achieve the desired results.
Minimal Tear-Out: Unlike some other cutting tools, card scrapers produce minimal tear-out, making them ideal for working with figured or delicate wood grain.
Finishing Tool: Card scrapers are often used as finishing tools to create smooth and glassy surfaces before applying finishes like varnish or lacquer.
Economical: Card scrapers are relatively inexpensive and have a long lifespan. With proper maintenance and sharpening, they can last a lifetime.
How to Use a Card Scraper:
Preparation: Start by preparing the workpiece. It should be flat, and any major imperfections should be addressed before using the scraper.
Holding the Scraper: Hold the card scraper with both hands, gripping it by the edges. The burr side should face down, and the scraper should be tilted slightly forward.
Angle: Angle the scraper slightly, usually around 45 degrees, to the direction of travel. This angle helps create a clean cut and minimizes the risk of digging into the wood.
Pressure and Movement: Apply gentle, even pressure to the scraper while pushing it forward. The scraper should remove very thin shavings of wood, resulting in a smooth surface.
Monitoring Progress: Periodically check the workpiece’s surface to gauge your progress and ensure that you’re not removing too much material.
Resharpening: As the burr dulls over time, you’ll need to resharpen it using a burnisher or specialized scraper sharpening tools. This process involves drawing the burnisher along the edge of the scraper to create a new, sharp burr.
Common Uses of Card Scrapers:
Card scrapers are commonly used in woodworking for various tasks, including:
Surface Smoothing: They excel at smoothing and leveling wood surfaces, removing machine or hand plane marks, and preparing wood for finishing.
Edge Jointing: Card scrapers are used to true up and refine the edges of boards and panels, ensuring they meet at a perfect joint.
Cabinetmaking: Woodworkers use card scrapers extensively in cabinetmaking and joinery to achieve precise fits for drawers, doors, and other components.
Veneer Work: Card scrapers are suitable for working with veneers, where precision is essential to achieve seamless joins.
Removing Glue Residue: After glue-up, card scrapers can remove excess glue squeeze-out efficiently without damaging the wood.
Detail Work: They are excellent for fine detail work, such as rounding corners, creating curves, and refining intricate profiles.
27. Spokeshave
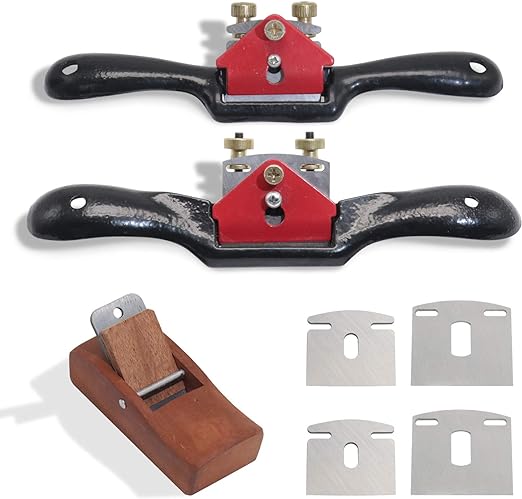 A spokeshave is a specialized hand tool used in woodworking for shaping and smoothing curved or irregular surfaces. It’s particularly valuable for creating rounded edges, chamfers, and intricate shapes on wooden workpieces. The spokeshave consists of a blade or cutter positioned between two handles, allowing for precise control and removal of wood. Here’s a comprehensive look at the spokeshave:
Components of a Spokeshave:
Blade or Cutter: The blade is the cutting edge of the spokeshave and is typically made of high-carbon steel. It has a sharp, curved profile designed for shaving wood.
Body or Frame: The body or frame of the spokeshave provides support for the blade and serves as a guide during shaping. It is often made of wood, metal, or a combination of both materials.
Handles: Spokeshaves have two handles—one on each side of the body. These handles provide a comfortable and secure grip for the user.
Adjustment Mechanism: Many spokeshaves have an adjustment mechanism that allows you to change the depth of the cut by adjusting the blade’s projection from the body. This feature enables you to control the thickness of the shavings.
Features and Characteristics:
Versatility: Spokeshaves are versatile tools suitable for shaping a wide range of wooden surfaces, including curved, concave, and convex profiles. They can handle tasks that are challenging for other hand tools.
Precision: Spokeshaves offer precise control, allowing woodworkers to make fine adjustments and achieve the desired shape and finish on their workpieces.
Efficiency: With a sharp blade and proper technique, spokeshaves can remove wood efficiently, making them valuable for shaping and smoothing tasks.
Smooth Finish: Spokeshaves produce a clean and smooth surface, minimizing the need for additional sanding or finishing work.
Ease of Use: They are relatively easy to use, making them suitable for woodworkers of various skill levels, from beginners to experienced craftsmen.
How to Use a Spokeshave:
Preparation: Ensure that the workpiece is securely held in place, either with clamps or a vise. This stability is crucial for safe and precise shaping.
Adjust the Blade: If your spokeshave has an adjustment mechanism, set the blade’s projection to control the depth of the cut. Start with a shallow cut and gradually increase it as needed.
Grip the Spokeshave: Hold the spokeshave firmly with both hands, placing one hand on each handle. Your dominant hand should be closer to the blade, while your other hand provides support and guidance.
Position the Spokeshave: Position the spokeshave on the workpiece so that the blade contacts the area you want to shape. Ensure that the blade is parallel to the grain for smooth cutting.
Begin Shaving: Push the spokeshave forward while applying gentle pressure. The blade will shave off thin layers of wood as you move along the surface. Maintain an even and controlled pace.
Test and Adjust: Periodically check the progress of your work by inspecting the surface. Make any necessary adjustments to the blade projection or technique to achieve the desired shape and smoothness.
Safety Precautions: Always exercise caution when working with sharp tools like spokeshaves. Keep your hands away from the blade’s path, and wear appropriate safety gear, such as eye protection.
Common Uses of Spokeshaves:
Chairmaking: They are essential for shaping chair legs, spindles, and other curved components.
Instrument Making: Spokeshaves are used in crafting musical instruments, such as violin scrolls and guitar necks.
Cabinetmaking: Woodworkers use spokeshaves to shape and refine the edges of cabinet doors, drawers, and other furniture components.
Boat Building: In boat building, spokeshaves are employed to shape wooden boat components like oars, tillers, and gunwales.
Woodturning: Spokeshaves are used to shape and finish woodturning projects, especially when working on the curved or rounded parts of the workpiece.
Decorative Woodwork: They are valuable for adding decorative touches to wooden objects, including chamfers, beads, and intricate profiles.
28. Wooden Miter Box
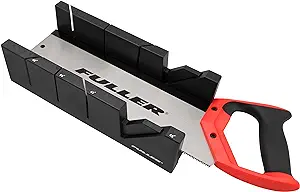 A wooden miter box is a specialized hand tool used in woodworking for cutting accurate and precise miter joints and angled cuts in wood. It provides a stable and guided platform for sawing at specific angles, making it an essential tool for creating clean and tight-fitting joints in various woodworking projects. Here’s a comprehensive look at the wooden miter box:
Components of a Wooden Miter Box:
Body: The main body of the miter box is typically made of wood, giving the tool its name. It is a rectangular or elongated structure with channels or slots to guide the saw. The body may have one or more slots at different angles, allowing for the cutting of various angles and miter joints.
Saw Guide Slots: The miter box features saw guide slots or channels that are precisely cut into the wood. These slots serve as guides for a handsaw or backsaw, ensuring that the saw follows the desired angle accurately.
Clamps or Hold-Downs: Some miter boxes include clamps or hold-downs to secure the workpiece firmly in place during cutting. These help prevent the wood from moving or shifting while you see.
Features and Characteristics:
Precision: Miter boxes are designed for precise and accurate angled cuts. They ensure that the cuts are consistent and match the specified angles, making them ideal for creating tight-fitting miter joints.
Stability: The miter box provides a stable platform for sawing, reducing the risk of errors or inaccuracies caused by hand sawing without guidance.
Versatility: Depending on the design, a single miter box can accommodate a range of angles, allowing woodworkers to make various miter cuts without the need for multiple tools.
Ease of Use: Wooden miter boxes are relatively easy to use, making them accessible to woodworkers of different skill levels, from beginners to professionals.
How to Use a Wooden Miter Box:
Select the Desired Angle: Determine the angle at which you want to cut. Most miter boxes have slots for common angles like 45 degrees and 90 degrees, but some may offer additional options.
Secure the Miter Box: Place the miter box on a stable work surface, ensuring it won’t move while you’re cutting.
Position the Workpiece: Place the wood you want to cut into the miter box, aligning the cut line with the appropriate slot in the box. If your miter box has clamps or hold-downs, use them to secure the workpiece in place.
Make the Cut: Using a handsaw or backsaw carefully saw through the wood along the guide slot in the miter box. Ensure that you follow the slot accurately to achieve a clean and precise cut.
Test the Fit: After cutting, test the fit of the miter joint or angled piece by joining it with another piece. Adjust as needed for a snug fit.
Safety Precautions: Always exercise caution when using saws and miter boxes. Wear appropriate safety gear, such as safety glasses, to protect your eyes, and use proper techniques to avoid accidents.
Common Uses of Wooden Miter Boxes:
Trim and Molding Work: Woodworkers use miter boxes to cut precise angles for baseboards, crown molding, and other decorative trim work.
Picture Frames: Miter boxes are essential for creating miter joints in picture frames, ensuring tight and seamless corners.
Furniture Making: In furniture construction, miter boxes help create angled joints for components like legs, frames, and tabletops.
Home Improvement: DIY enthusiasts and homeowners use miter boxes for tasks like installing door frames, window casings, and wainscoting.
Craftsmanship: Miter boxes are used in various crafts and hobbies that involve woodworking, providing a means to create angled components for projects.
29. Dovetail Jig
A dovetail jig is a specialized woodworking tool used to create precise and consistently spaced dovetail joints. Dovetail joints are known for their strength, durability, and aesthetic appeal, making them a popular choice for joining wood in various woodworking projects. The dovetail jig simplifies the process of cutting dovetail joints, especially for those who may find it challenging to cut them by hand. Here’s a comprehensive look at the dovetail jig:
Components of a Dovetail Jig:
A typical dovetail jig consists of the following components:
Template or Jig Body: The template or jig body is typically made of metal or plastic and serves as the main structure of the jig. It features guides, slots, and templates that guide the router or hand-held router bit to create dovetail joints.
Guide Fingers or Templates: These are the key components that determine the shape and spacing of the dovetail joints. Guide fingers are often adjustable to accommodate different joint sizes and configurations.
Clamps or Hold-Downs: Dovetail jigs may include clamps or hold-downs to secure the workpiece in place during routing, ensuring that it remains stable and accurately positioned.
Router Bit Guides: Dovetail jigs come with guides or bushings that fit into the router’s base. These guides follow the templates, allowing the router bit to cut the dovetail pattern accurately.
Depth Stops: Depth stops or adjustable stops allow you to control the depth of the router bit’s cut, ensuring that the dovetail joints are cut to the correct depth.
Features and Characteristics:
Dovetail jigs offer several features and characteristics that make them valuable tools in woodworking:
Precision: Dovetail jigs are designed to create dovetail joints with exceptional precision and consistency. This ensures that the joints fit snugly and look clean and professional.
Efficiency: Using a dovetail jig is generally faster and more efficient than cutting dovetail joints by hand. It’s especially useful for producing a large number of identical joints.
Versatility: Many dovetail jigs allow for adjustable guide fingers, which means you can create various dovetail configurations, including through dovetails, half-blind dovetails, and sliding dovetails.
Repeatable Results: With a dovetail jig, woodworkers can achieve repeatable results, making it suitable for projects like drawers, cabinets, and boxes that require multiple dovetail joints.
User-Friendly: Dovetail jigs are relatively user-friendly, making them accessible to woodworkers of various skill levels, from beginners to experienced craftsmen.
How to Use a Dovetail Jig:
Using a dovetail jig involves the following general steps:
Select the Joint Type: Determine the type of dovetail joint you want to create, such as through dovetail, half-blind dovetail, or sliding dovetail.
Adjust the Guide Fingers: Set the guide fingers on the dovetail jig to match the size and spacing of the dovetail joints you need for your project.
Secure the Workpiece: Place the workpiece between the clamps or hold-downs on the jig. Make sure it is firmly secured and positioned according to the jig’s instructions.
Router Setup: Install the appropriate dovetail router bit in your router and adjust the depth stop to control the depth of the cut.
Routing: Guide the router along the guides and templates on the dovetail jig. The router bit will remove material from the workpiece, creating the dovetail joint as it moves.
Test Fit: After routing, test the fit of the joint by joining the workpieces together. Make any necessary adjustments if the fit is too tight or too loose.
Repeat: Repeat the process for the remaining joints in your project, maintaining consistency in spacing and sizing.
Common Uses of Dovetail Jigs:
Dovetail jigs are commonly used in woodworking for various applications, including:
Drawer Construction: Dovetail joints are a popular choice for constructing drawers in furniture and cabinetry.
Box Making: Dovetail joints are used to create tight-fitting corners in wooden boxes, including jewelry boxes and decorative containers.
Cabinet Joinery: They are employed in cabinetmaking for joining cabinet sides, corners, and other structural elements.
Furniture Joinery: Dovetail joints are used to connect various parts of furniture, such as table aprons, chair frames, and case pieces.
Decorative Woodworking: Dovetail joints can also be a decorative element in woodworking projects, showcasing craftsmanship and attention to detail.
30. Vise
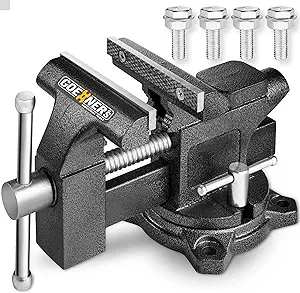 A vise, also spelled “vice” in some regions, is a versatile and indispensable tool used in various applications, particularly in woodworking, metalworking, and other crafts. It is designed to securely hold workpieces in place, allowing for precise and controlled operations such as cutting, drilling, filing, and assembly. Vises come in various types and sizes, each tailored to specific tasks and workpiece sizes. Here’s a comprehensive look at the vise:
Components of a Vise:
Jaws: The jaws are the primary gripping surfaces of the vise and come in pairs—an upper jaw and a lower jaw. They are usually flat, parallel, and serrated or grooved to provide a secure grip on the workpiece.
Screw Mechanism: The screw mechanism is responsible for controlling the movement of the jaws. It consists of a threaded screw and a handle. Turning the handle clockwise or counterclockwise moves the jaws closer together or farther apart.
Base or Mounting: The base or mounting of the vise attaches it to a workbench or other stable surface. It ensures that the vise remains steady and secure during use.
Swivel Base (optional): Some vises have a swivel base that allows the entire vise to rotate horizontally. This feature enables the user to position the workpiece at various angles for added versatility.
Features and Characteristics:
Holding Power: Vises provide exceptional holding power, keeping workpieces firmly in place even during rigorous operations. This stability is crucial for precise and controlled work.
Precision: Vises allow for precise positioning and alignment of workpieces, ensuring accuracy in cutting, drilling, and other operations.
Safety: Using a vise enhances safety by keeping hands and fingers away from cutting or drilling tools, reducing the risk of accidents.
Versatility: Different types of vises are designed for specific tasks. Some are tailored for woodworking, metalworking, welding, or other crafts, making them versatile tools in various trades.
Ease of Use: Vises are relatively easy to use, making them accessible to individuals with different skill levels, from beginners to experienced professionals.
Types of Vises:
Bench Vise: Bench vises are the most common type and are mounted on workbenches. They have flat, parallel jaws and are ideal for holding workpieces during general woodworking, metalworking, and crafting tasks.
Woodworking Vise: Woodworking vises are specialized bench vises designed for woodworking tasks. They often have wider jaws with wooden or non-marring faces to protect delicate wood surfaces.
Machinist Vise: Machinist vises are designed for precision metalworking and machining. They typically have finer adjustments and are made of materials that can withstand heavy use and machining fluids.
Pipe Vise: Pipe vises are used for holding pipes or cylindrical objects securely while cutting, threading, or shaping them. They have jaws with curved or V-shaped grooves to grip pipes effectively.
Angle Vise: Angle vises have a tilting feature that allows workpieces to be positioned at various angles, making them suitable for tasks like drilling or milling at precise angles.
Multi-Purpose Vise: Some vises are designed to perform multiple functions. They may have interchangeable jaws or features that make them adaptable for different tasks.
| See more woodworking tools 31 to 40 |
How to Use a Vise:
Mount the Vise: Securely attach the vise to a stable work surface, such as a workbench. Ensure that it is firmly anchored and does not wobble or move during use.
Position the Workpiece: Open the jaws of the vise by turning the handle counterclockwise. Place the workpiece between the jaws and align it as needed for the task at hand.
Tighten the Jaws: Turn the handle clockwise to close the jaws and grip the workpiece firmly. Apply enough pressure to hold the workpiece securely but not so much that it damages or deforms the material.
Perform the Task: With the workpiece securely held in the vise, proceed with the cutting, drilling, filing, or other operations as required.
Release the Workpiece: After completing the task, turn the handle counterclockwise to open the jaws and release the workpiece.
Maintenance: Regularly inspect and maintain your vise to ensure it functions correctly. Lubricate the screw mechanism as needed and keep the jaws clean.


1 comment on “50 Essential Hand Tools 21 to 30”